Wednesday, October 30, 2013

Halloween Brown Bag

I have been enjoying all the little gift bag inspiration that I have been seeing on Pinterest lately!  From burlap to canvas to brown bags.  I thought I'd try my hand at creating a brown bag that was Halloween themed!

I used some Halloween stamps from Momenta to create this.  The spider border is created by stamping one after another.  I then also stamped the sentiment and then folded it, along with an orange banner, over the top of the bag and then secured it with a black wood clothespin.  Finished the whole thing off with some great washi tape.  I'm excited to try some more of these in other themes....love how quickly you can jazz up a simple brown bag!

Supplies Used:
Stamps: Momenta
Patterned Paper: Momenta
Cardstock: American Crafts
Washi Tape: My Minds Eye
Color Mist: Heidi Swapp

Embellishing a Paper Clip with Ribbon

I am up on the Ribbons Unlimited blog today!  I am always on the lookout for ways to use ribbon in new ways on my cards.  I was recently playing around with paper clips and came up with a simple and different way to incorporate ribbon!

Paperclips are trendy and easy to find...so why not find a way to incorporate them on a card!  I simply tied a knot at the top of mine and slid it over a ribbon strip on my card.  Think of the possibilities on this - you could do anything from cute to elegant depending on your ribbon choice and make use of it on layouts, tags, cards and more.  

Ribbons Unlimited Supplies Used:

Other Supplies Used:
Patterned Paper: American Crafts, Momenta
Enamel Dots: My Minds eye
Stickers: American Crafts, Jillibean Soup

Monday, October 28, 2013

Imaginisce "Childhood" Layout

Every time I looked at these pictures that song "You're My Sweetheart" kept coming to my mind.  So I felt it only appropriate to create a layout with a big, significant title that brought attention to the photos.  The Imaginisce line "Childhood" was perfect for documenting these pictures!
My son and this little girl have managed to find each other as best buds.  She bosses him around like no one else and gets away with it and pretty much every day he asks to go to her house!  It is a must document relationship!

Tips:  To create my title I used a variety of fonts and colors - I think that makes it a little more interesting.  Some of it is a Silhouette Cameo cut and the rest is various thickers. Because of my big title, I embellished minimally adding stickers and such from this same "Childhood" line.

Supplies Used:
Patterned Paper: Imaginisce
Stickers; Imaginisce & American Crafts
White Pen: Uniball Signo

Saturday, October 26, 2013

Happy Haunting Halloween Lantern

Popping in to share my last creation with "Happy Haunting" by My Mind's Eye!  Thanks to some help from my Silhouette Cameo, I created a little Halloween lantern!  They had several choices available and I opted for the spider web one.  Not to creepy and not too cute, just right :)

I added some glittery paper behind the webs on the lower parts but not the top part so that if I want to actually use a candle (seems like a battery powered tea light would be the smart option here) I can still have it shine thru!

Chipboard sentiment and shapes were perfect to decorate each side.  I also added some fun brads to the top creases - that bat shape and brad just had to be used!  I also used some black pom pom trim that I have been hoarding for awhile now.  My ribbon and trim piles are getting a little insane....need to start purging those and getting them organized.

Hope you have enjoyed all the fun projects with this line.  It is available at The Scrapbooking Studio!

Supplies Used:
Cardstock: American Crafts
Patterned Paper: My Minds Eye
Chipboard: My Minds Eye
Brads: My Minds Eye
Twine: The Twinery


Thursday, October 24, 2013

"Happy Harvest" by Doodlebug Design Layout

I picked up some of the Doodlebug Design "Happy Harvest" collection and have been itching to play with it, but had to find the time to do so!  This week it happened and here's what I created:
 Happy Harvest by Doodlebug Design - Kiwi Lane Templates
Isn't this a fun collection???  It has all the bright colors that I love mixed in with some solid fall colors.  

Tips:  I created my background heart using a Kiwi Lane template (Chestnut Drive) and layering it - then trimming around to bring out the heart shape.  It needed an extra punch to bring out the layers so out came one of my standards...doodling with my white pen!

I also used the lines from the template to give life to my title.  I am REALLY enjoying these templates and using them in different ways to bring some unique life to my projects!

Supplies Used:
Patterned Paper: Doodlebug Design
Stickers: Doodlebug Design & American Crafts
Decorative Tape: Queen & Co.
Staples: Tim Holtz

Wednesday, October 23, 2013

Christmas Tree Card Class at The Scrapbooking Studio

My next card class at The Scrapbooking Studio in Bloomington is coming up quickly!  Come join me on November 8th from 6-8 pm to make four different kinds of Christmas tress - we'll be doing folding (as always :)) and using a different Epiphany Crafts Shape Making Tool! Call (309)585-0409 to reserve your spot!

Sunday, October 20, 2013

Christian Wall Decor and Card for Paper House Productions

Included in my design team box for Paper House Productions was a set of Christian themed stickers and papers.  Perfect for me!  My hubby loved them when he saw them too, so I knew I wanted to make something that might be able to hang in his office.  My first project does that perfectly!

Christian home decor using Paper House Productions by Christine Meyer
To create this I cut up two of the cross patterned papers (you have to use two because there isn't enough with one once you cut off the bottom of the cross).  I then matted those onto ivory cardstock and set the whole thing up on blue paper.  The frame I used is actually a record frame...so it is 13 X 13 and it worked just perfectly.  My phrase comes from the Silhouette Online Store and I shifted things around to make them fit accordingly.  I also added some dove stickers (also from the set) and some sparkles.  This would be perfect home decor or in my hubby's case Pastor's study decor!

Christian home decor using Paper House Productions by Christine Meyer


Christian card for Paper House Productions by Christine Meyer
 I also made several cards from the set and this is my favorite.  There you can see that same cross....I didn't use it on my second sheet so it was available to fussy cut and make use of.  I used a different patterned paper with hands that are folded in prayer.  I wanted to do something unique that would add some interest to the card, so I decided to go the grid route again.  After I cut each square, I inked the edges so they would pop more.  I added the sentiment sticker, a bow, and some enamel dots as finishing touches.

Supplies Used:
Patterned Paper: Paper House Productions
Cardstock: American Crafts
Ribbon: Ribbons Unlimited
Enamel Dots: GCD Studios
Sparkles: Queen & Co.


Friday, October 18, 2013

Eat Drink & Be Scray: My Minds Eye "Happy Hauntings" Layout

I've decided that handsdown Halloween is my favorite day to paper craft.  I am always happy with what I come up with for Halloween!  Here's another layout I created for The Scrapbooking Studio.  I'm pretty sure it weighs a couple pounds because it is layer upon layer upon layer :)
Tips: See those scallops with the spiderwebs up top?  Those are actually plain old fussy cut circles - I stamped the spider web in them and then cut them in half.  I also wanted some additional texture underneath my skeleton - so I used my fringe scissors and cut up thesolid cardstock that way!

Supplies Used:
Fringe Scissors: Martha Stewart
Stickers, Paper, Stamps: My Minds Eye

Thursday, October 17, 2013

3D Letters from Cardstock

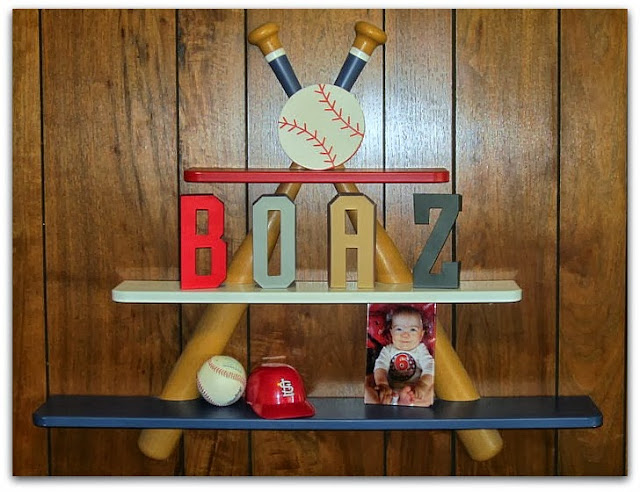
I am up today at CutCardStock!  As I looked at the rich hues of the reds and blues in the Flavours Gourmet line, I knew I wanted to do something in my son's bedroom with them.  He has a baseball themed room and being the fourth child, it is to say the least, neglected.  I came across these 3D Letters that I knew would be just perfect!

3D Letters from Mr. Printables - project by Christine Meyer for CutCardStock
Can you believe those are just cardstock????  My husband walked in and thought they were wood!  


 Now I could give you a long, drawn out play by play on how to create them.  But really, it's as simple as print them on your cardstock, cut them out, fold them, and adhere!  You have got to check out this link to Mr. Printables where he provides every letter of the alphabet.  

The lines print in dark grays...and they showed up great on the three lighter color cardstocks (chili arbol, chestnut creme, and squid ink) and well enough that I was able to get the job done on the darker cardstock (candied blue violet)!

Sometimes I am just amazed how great cardstock can transform a project, and in this case, a room!  

CutCardStock Supplies Used:


Tuesday, October 15, 2013

My Minds Eye "Happy Haunting Card"

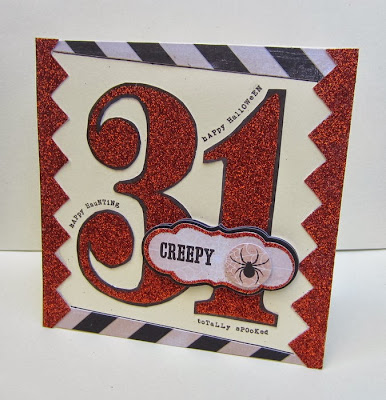
Fussy cutting was the name of the game for my projects for The Scrapbooking Studio this month. And this card was no exception!  
My Minds Eye "Happy Haunting Card" by Christine Meyer for The Scrapbooking Studio
I cut out the glitter border and the 31 from patterned paper.  I also cut the striped border from some patterned paper.  Probably my favorite thing about this card is the stamping I did! I haven't done a lot of stamping in recent days...so it was nice to exercise that part of my brain again :)

Tips:  Clear stamps are perfect for curving and making them work with your design as I did with my words curving along with my 3 and 1.  

Supplies Used:
All Supplies are My Minds Eye "Happy Haunting"


Sunday, October 13, 2013

Beware - Something Stinks!

I absolutely loved getting to work with Happy Haunting from My Mind's Eye for The Scrapbooking Studio this month!  It is full of glitter and all kinds of spooky fun.

Tips: This line has some beautiful papers full of great patterns.  I did a lot of fussy cutting to break up some of those patterns.  The zig zag paper is cut from a fullsheet, the circles with the orange border are fussy cut from a bigger sheet. And underneath is all is a giant "31" that I couldn't find a way to incorporate into my design (but I knew I wanted the orange glitter border) so I hid it underneath my zig zag paper.  

Techniques: To break up all the zig zag lines and their rigid look, I brought in lots of circles.  It offers a little contrast as opposed to if I had gone with a bunch of polygon style embellishments.

Supplies Used:
Letter Stickers: American Crafts
Everything else if from My Minds Eye

Friday, October 11, 2013

My first Kiwi Lane Designs Post

I am so very excited to be sharing my first post for Kiwi Lane Designs today!  This month we got to work with various lines from American Crafts and I got to use some pieces from the Dear Lizzy line "Polka Dot Party"

Now you may not have heard of Kiwi Lane before....they are a company that makes templates (such as you see above) to help you get the basics of your layout done!  One of their main techniques is called "framing" in which you set up the whole process first.  That is what the picture above is: my framing of the project!  
Christine Meyer for Kiwi Lane Designs
And this is the actual project!  You can see where the framing came in and gave me my basic start! 

 Part of my first assignemnt was to use Pinterest for my inspiration.  That was easy except I had a hard time narrowing it down!!!  I have been looking at lot at patterns, etc. and so I chose this picture as my inspiration:

And you can see here how I mimicked the doodling look!

 I am really enjoying working with these templates and look forward to playing more with them and exploring all kinds of fun techniques!

Supplies Used:
All paper/stickers are from American Crafts

Wednesday, October 9, 2013

Gymnastics Projects

I have been excited to use these Paper House Productions products since I opened up my design team box! I have loved gymnastics my whole life and my little Lucy loves it now too!  I knew I had the perfect pictures to pair this line with!  Today I am going to share with you a layout and a couple of wall hangings that I created.

Gymnastics Layout for Paper House Productions by Christine Meyer
Tips:  Working with paper that has a lot built into it already can be tricky - not wanting to cover up all the pretty design but also wanting your pictures to stand out.  I added my pictures to the center but then also die cut some stars to help the design flow into the pictures.

Techniques:  The pictures on their own could easily get lost - but layering pieces underneath the pictures helps to really draw the eye in.  I used circles to break up the rigidity of the stars and then some tags because I felt like the bows on them would add to the overall girly feel of the page :).

Shhhhhhh....these two wall hangings are Christmas presents for Lucy!
Gymnastics Wall Hanging for Paper House Productions by Christine Meyer
Tips:  To bring out the glitter in the stickers I matted the piece with some glitter foam.  It added dimension and matched perfectly.
Techniques:  A lady who comes to my monthly card class, Donna, introduced me to a very simple technique that you see employed here!  She showed me a card where she took a 2 X 6" piece of paper and then cut it on the diagonal to create sunbursts.  I can't tell you how many times I have used that since she showed it to me!  It is such a simple way to add a sunburst without a whole lot of measuring, tracing, etc.  I used the "Little Girl Paper Pad" for this.

Gymnastics Wall Hanging for Paper House Productions by Christine Meyer
Tips: There's that same paper again!  I used it for this and only used the top corner for it.  It's hard sometimes to cut into paper like that and disturb the design....but when you can find a way to do it, it can be fabulous!  I also combined the stickers to make the "I love gymnastics" sentiment look like a balance beam with the girl to her handstand on it!


Supplies Used:
Gymnastics 3D Stickers from Paper House Productions
Little Girl Paper Pad from Paper House Productions
Gymnastics patterned paper from Paper House Productions


Monday, October 7, 2013

September Publications

I realized today that I hadn't yet shared with you my cards from the September issue of CARDS Magazine. I had five picked up but with the downsizing of the magazine into a digital format, they only used three!  That is okay though - because I am still gonna share them all with you!  

First up are the two they didn't end up using:
This one was for the "woodgrain" topic.  
Supplies from: Echo Park, American Crafts, and GCD Studios

 This one was for the "diecut" topic.
Supplies from: Pebbles, SRM Stickers, Prima, and The Twinery

This one was for the "clean and simple" topic.  I actually had created this one last winter and found that it fit a sketch challenge for another magazine almost exactly (I guess that is another good thing about clean and simple..it can kinda match up to a sketch and surprise you :).  It didn't get picked up then and so I submitted it for CARDS and they grabbed it.   Just goes to show...if at first you don't succeed.  I felt like it had some unique elements to it...
Supplies from: American Crafts

And for a not so clean and simple one....this one was for the "grandparents" topic.  I jumped on the pie chart trend right as it was starting up.
Supplies from: Bella Blvd, Pebbles, GCD Studios, American Crafts, Studio Calico, and The Paper Studio

Lastly this one was for the "pockets" topic.  
Supplies from: American Crafts, Pink Paislee, and Maya Road

I've submitted about 20 cards this month (to multiple magazines) - we'll see if something I did catches their eye again!


Saturday, October 5, 2013

Upcoming Class at The Scrapbooking Studio

I am reposting this for all my local friends!  We had to move the original date because the supplies weren't available - but we are all ready to go this time around!  It's time for another installment of Quilted Cards at The Scrapbooking Studio in Bloomington, Illinois.  This class will take place on Friday, October 11th from 6-8pm!  If you are interested in getting a spot you can call the store at (309)585-0409.  There is a limited number still available and I'd love for you to grab one!

The cards this month are fall themed and use the gorgeous new paper line "Reflections - Fall" by Lori Whitlock for Echo Park.  As soon as I laid eyes on this line, I knew it would be perfect!

Create a Quilted look on cards

Create a quilted look on cards
Create a Quilted Look on cards

Create a Quilted Look on Cards

Friday, October 4, 2013

CutCardStock Canvas

 Some of my friends have titled me the "Canvas Queen" because I love to make simple canvas home decor using my paper crafting supplies!  It's quick, easy, and I can change it out when I want a new color combo or look!  Today I am sharing a canvas that I made for CutCardStock.

To create this project you just need a few simple supplies:
-An 11 X 14" Canvas
-A 1 1/2" circle punch
-A Heart punch
And one sheet each of (links are available at the bottom of the post):
Flavours Gourmet Candied Blue Violet Cardstock
Flavours Gourmet Chili Arbol Cardstock
Flavours Gourmet Lemongrass Cardstock
Flavours Gourmet Caramelized Mustard Cardstock
CTI Glama White Marble 
(Any of the sizes can certainly be changed to fit your supplies)

-Punch out enough circles to cover your canvas and then determine if you want to make them in matching rows or random (I went with random).
-Attach them to your canvas.
-Use your heart punch and punch hearts from the 
CTI Glama White Marble .
-Add those randomly throughout your canvas.

And there you have it!  A quick and easy way to add a fresh, one of a kind piece of decor to your house!

CutCardStock Supplies Used:
Marble Translucent Text
Navy Card StockMustard Yellow Card StockYellow-Green Card StockRed Card Stock
 Have you entered the CutCardStock World Cardmaking Day contest yet? It couldn't be easier...we'd love to have you enter!  Click here to find all the details!
Christine Meyer
CutCardStock Design Team Member

Thursday, October 3, 2013

WRMK Winner

The winner of the goodies from my WRMK guest designer post is:
[120519+039.JPG]
Cheryl W!

Shoot me an email at practicalscrappers@gmail.com and I will get those out to you Cheryl!

Wednesday, October 2, 2013

Weaving together a beautiful card

I am up today at Ribbons Unlimited sharing another weaving card!  
How to incorporate weaving on a card by Christine Meyer for Ribbons Unlimited
Last week I used the a wide white organdy but this week I used a Delight Satin Edge Ribbon in black that is just 5/8" wide.  It is a little more challenging to weave and keep things straight...but in the end it worked!
If you look closely you can see that I used it in my circle.  

Tips: To create this look, I traced almost a whole circle on the edge of my card and cut that out.  I weaved my ribbon onto a rectangle piece of black cardstock that would fit behind the circle.  Once done, I attached it with strong wet adhesive and set in under a book to flatten it out.

This technique is fairly new to me, especially with ribbon, but is one that I plan to use again to add texture and sophistication to my projects!  

Supplies Used:
Patterned Paper: Teresa Collins
Stickers: SRM Stickers (Sentiment), Paper House Productions (rose)
Metal Embellishment: Momenta

LinkWithin

Related Posts Plugin for WordPress, Blogger...