Tuesday, December 31, 2013

Lovin' it Here - An Imaginisce Layout

I thought I'd pop by and share one last layout for 2013!  I created this one last night using some goodies from Imaginisce.  My design team gig officially begins tomorrow with them and I am ready to roll!
I wanted to play up the boy features on this one so the kraft color was my jumping off point.  I then added some light blue and red to tie it all together.  Some stars and twine were perfect for boy fun too!  I added vellum right behind the two big pictures to add a little softness to the whole layout.  I also pulled a few stickers from my stash to add little sentiments here and there!  Hard to believe these pictures were already four months ago!  Good news is that he just keeps getting cuter.  But the bad news is he keeps getting more mischievous too ;).  If you check out that top picture the mischief shouldn't be a big surprise!    
Happy New Year!

Supplies Used:
Patterned Paper: Imaginisce
Stickers: Jillibean Soup, American Crafts, October Afternoon, GCD Studios
Star Punch: Fiskars
Enamel Dots: Teresa Collins
Burlap: Little Yellow Bicycle

Sunday, December 29, 2013

Playing with the My Mind's Eye Sketch


My Mind's Eye December Sketch - by Ronda Palazzari

As soon as I saw this month's sketch at My Mind's Eye, I knew I wanted to play along.  Lucy wanted me to take a picture of her with her new doll and make the picture right away, so this was the perfect excuse to do just that!  I had tons of pieces left from Cut & Paste and they were a good match for the outfits her and her doll were wearing! I absolutely love how beautifully My Mind's Eye coordinates their lines...they have become a new favorite of mine! Over the last six months I have had the opportunity to play with their lines on several occasions and now I can't get enough!


I'm not much of a sketch person.  I want to change that this year and so this was a good jumping off point.  I'm going to be honest with you...as I started I was hating the direction it was going.  But as I continued, I liked it more and more!  As you can clearly see I definitely started with the sketch but really carried it in my own direction from there.  The words "And So It Begins" were a perfect addition to the new world we've unleashed with an American Girl Doll in the house!  If you follow me on Pinterest you are going to see that I am definitely pinning more sketches....and going to be giving this element of the industry a real shot!

Supplies Used:
Patterned Paper: My Mind's Eye
Brads: My Mind's Eye
Stickers: My Mind's Eye
Wood: Studio Calico

Thursday, December 26, 2013

Top Ten of 2013 Blog Hop (with a Giveaway!!!)

2013 is wrapping up and that means it is time to share my 10 Favorite Projects of the Year!  

It has been another fun filled year for me in the Scrapbooking Industry!  I've been blessed to design for several companies and get published multiple times throughout the year.  I continue to love this hobby and am so thankful for the downtime and creative outlet it provides me with!  

I've gathered together with a group of talented ladies from throughout the scrapbooking industry for a blog hop that is abundant in talent.  And bonus....there's some prizes along the way too!  I have a goody package to giveaway and I will share all the details of that below my Top Ten.  

Picking my top ten was totally hard!  Some of these are sentimental favorites, some are just designs I love, and some may even be things that no one will love besides me :)  I am fairly convinced that if you look thru all the projects of the year, you would come up with a different list for me, that's the beauty of this hobby!  So without further adieu, here are my Top Ten!


This was created purely for enjoyment!  I absolutely loved Teresa Collins Christmas line "Santa's List"

Reverse canvas using holiday decor
I created this reverse canvas for a design team project for Ribbons Unlimited.  The heart is made up of tinsel garland!


This layout was created for Kiwi Lane design team project and features lots of My Mind's Eye goodies!

Happy Harvest by Doodlebug Design - Kiwi Lane Templates
This was another "just for fun" layout featuring all kinds of goodies from the Doodlebug Design "Happy Harvest" line.  This is probably my favorite layout of the year!

Christian home decor using Paper House Productions by Christine Meyer
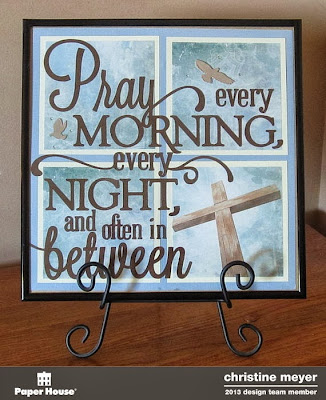
I created this wall hanging for a design team project for Paper House Productions.  It is going to be featured on a display board in Joann's stores nationwide in the coming year!


This card was published in Paper Crafts Magazine in a special feature using household items...the blue heart is made up of trash bag ties!


Quite a contrast in card style from the last one!  This was created as a sample for The Scrapbooking Studio - a fabulous online and local store!


This was also a sample for The Scrapbooking Studio!  It is another reverse canvas. For this one I created the heart by folding circles into squares!  I really enjoy creating canvasses :)


I love everything about this layout....all the triangles, the quote, the feather, and most of all the crrrazy picture of my sweet boy!  This was made for fun and features lots of Bella Blvd.


This last one is also a sample for The Scrapbooking Studio.  I had fun playing with the title work on this one and just adore the colors in this line from Pebbles Inc.

So what do you think?  Did I capture some good ones???

Now for the rest of the hop! 
You should have arrived here from Monika's blog, if you didn't you definitely will want to go back there and check it out! Here's the whole list:
Christine Meyer ***You are here****
Suzanna Lee ***Head here next***
That means next up you get to go see one of my absolute favorite scrappers in the whole industry! She's talented, she's kind, she designs for soooo many awesome companies, and she's one of my very closest scrappy friends - so go show her some love and be amazed by the talent of Suzanna Lee!


"Front Porch" by Pebbles Mini Album

I have one last project to share with you today that features "Front Porch" by Pebbles.  I don't do a lot of mini albums but I am trying to change that!  I got a new Cinch machine from The Scrapbooking Studio and have big plan s for playing with it lots!  For today's album I simply used some of the Polaroid frames that are made from a heavy weight cardstock as my base and bound them together with a metal ring.

I knew I wanted to create just a general album using up some cute pictures of my kids that haven't already found a home!  So I created my cover with some stickers about being Thankful for the everyday.

Each kiddo got a big polaroid page and a little one too.  Here is a sampling of a few of them.  I also used a quote sticker for each kiddo that fit their personality.  I liked working with this smaller size...things went quick and there wasn't a lot of thinking...something either worked or it didn't!

Supplies Used:
Patterned Paper: Pebbles Inc
Stickers: Pebbles Inc, Jillibean Soup
Enamel Dots: Recollections
Decorative Tape: Bella Blvd

Tuesday, December 24, 2013

Kiwi Lane & Authentique at Christmas

Every month at Kiwi Lane we have a different sponsor and this month it is an old favorite of mine: Authentique.  I love the softer colors and vintage style to their designs.  Today I shared a two page layout and a card on their blog!

 Another ruffle card....this time using a Kiwi Lane Template!

Here's the two pager...which doesn't translate great because it is so small :)  So here's some closeups!

On the blog I share an idea on how to combine templates to create a 24 inch border piece 

And here's the second page!  Check out that middle picture :)  Classic....hopefully we can do better next year!

If you want to know more about how I created these projects and find lots of other scrapbooking ideas - hop on over to the Kiwi Lane Blog!

Supplies Used:
Patterned Paper: Authentique
Stickers: Authentique
Wood: Studio Calico
Templates: Kiwi Lane

Monday, December 23, 2013

Snowflake Card Ideas

It's my day to show off the Stardream Metallic Cardstock at CutCardStock.  This stuff is stunning but a bit of a toughie to photograph....see all that shimmer! :)  To create the base of the card I used a cut from Samantha Walker.

I cut the base for this card from the Sapphire Stardream Metallic Cardstock (totally my favorite of all of them!) I used my Silhouette Cameo and then backed the front with  CTI Glama White Marble Translucent paper.  It reminded me of snow with the marble look it has...making it perfect for a snowflake card!  You may have noticed that several of us have been using the Silhouette Cameo to do our projects recently.  I was stunned at how beautifully it cut thru this cardstock!  I just set it to double cut my card and it came out nice and crisp.    A few simple stickers, gems, and washi tape are the final touches.

This card is way more simple than it first appears.  The base is created with more Crystal Stardream Metallic Cardstock.  I then used a snowflake punch and punched out Antique Gold Stardream Metallic Paper.  I created a row of snowflakes along the bottom of the card and worked up from there - connecting limbs of the snowflakes.  Adhering these was nice and easy - I used a mini glue dot in the center of each snowflake.  Once I reached a height I was satisfied with I topped them with a ribbon border.  A doily and letter stickers polish the card off and create the trendy combination of silver, gold, and white.   

Supplies Used:
Cardstock: CutCardStock
Ribbon: Walmart
Letter Stickers: American Crafts
Stickers: Echo Park, SRM Stickers
Washi Tape: Queen & Co.

Sunday, December 22, 2013

Washi Tape Christmas Card

I've been cranking out a few more Christmas cards and have those to share with you over the next few days!  First up is one where I played with washi tape and chevrons...totally inspired by this post on the My Mind's Eye blog.

I won't go into depth as to how I created it, because the link will tell you just that!  I will tell you it was fast and a fun experiment in figuring out patterns and colors to play with.  I knew I wanted a non-traditional color scheme!  Cards like this are perfect for that time when you need a few quiet moments to create (which in my case means breathe) but don't have tons of time!  

Supplies Used:
Washi Tape: My Mind's Eye & Queen & Co
Sticker: Jillibean Soup

Thursday, December 19, 2013

Pebbles Inc "Front Porch" Cards

I love it when a company creates great stickers/embellishments for cards!  Today I have a couple of cards using "Front Porch" to share with you that I made as samples for The Scrapbooking Studio

.For this first card, I used a Samantha Walker cut file to create the base.  I then just added a couple of colors underneath random hearts.  Added a quick doily and topped that with a sentiment.  

This second card is clean and simple!  A doily is featured once again (it appears I am on a doily kick) along with several patterned papers, stickers, and enamel dots.  I love the feminine feel to this one!

Supplies Used:
Patterned Paper: Pebbles
Enamel Dots: Recollections
Stickers: Pebbles

Wednesday, December 18, 2013

Ideas for Creating a Pretty Gift Bag

If you aren't careful, wrapping a gift can cost a fortune.  I love to present things in a pretty manner and of course still want it to be frugal too!  I had several gift cards to wrap up this year and wanted to present them in a way other than inside of a card.  Enter my new favorite thing to decorate....a brown paper bag.  I'm telling you what, you can make a brown bag look gorgeous simply by adding a some white doilies and stickers to it.  For today's edition I used primarily SRM Christmas Stickers.  SRM Stickers are a go to in my stash because they are see through, which makes them work with just about everything!
 For all three bags I used a doily (or two), a twine bow, a Christmas tree sticker (SRM Stickers by the Dozen), and a washi tape covered clothespin.  Other than that they each took on a life of their own!

For this one I used a big "Merry Christmas" title that I cut in half and then placed it.  

On this one I used several of the borders from SRM Stickers...actually everything but the Christmas trees are borders (just trimmed down)

I think this one actually ended up being my favorite!  I like the pop of yellow and got to play with my new star punch on it!

So the next time you are stuck for gift wrap, look around your craft area and see what you can come up with to make a one of a kind presentation!

Supplies Used:
Stickers: SRM Stickers, Teresa Collins
Star punch: Fiskars
Sequins: Teresa Collins
Doily: Wilton
Washi Tape: My Minds Eye & Doodlebug Design


Monday, December 16, 2013

Pebbles Inc "Front Porch" layout

So there's about nine inches of snow on the ground here....seems like the ideal time to scrap some summer pictures right!?!  I have another layout to share today featuring pieces from the Front Porch Collection by Pebbles Inc, made for my design team work for The Scrapbooking Studio.
I had fun playing with some Samantha Walker cut files on this one again!  The blue scallop background, the heart, and the Happy Birthday are all from her.  Additionally, I cut a second set of the blue scallops and then cut hearts out from that to top the original border.  Every time that I looked at it, I kept seeing the top of a bunch of hearts...so I had to find a way to incorportate it!  This is definitely not a line geared at children's pages, but for some reason I had my mind set on using these pictures.  To make it more kid friendly, I brought in some of the bright pops of green and aqua.  Anyone else have the urge to scrap summer when the cold hits???

Supplies Used:
Patterned Paper: Pebbles Inc
Cut Files: Samantha Walker
Washi Tape: Bella Blvd
Enamel Dots: My Minds Eye
Wood: Studio Calico

Saturday, December 14, 2013

You Only Live Once....

My son Cooper is funny, sweet, and full of personality.  Today I have a layout to share that showcases his personality.  It features as quote from Coco Chanel (sp??) as the title: You Only Live Once, So You may as Well Be Amusing:

I used my Cameo to die cut a variety of triangles in a different (but coordinating) patterned papers.  I laid them out to try to create a "one of a kind" background. I outlined certain triangles in black and used some black doodling throughoutt. I then worked my title around it.  I also added a fun feather because I thought it played up the silliness of the photo!  On this day he had put his shirt up like that and was pretending to be a monster.  How can you not smile at that?????  

Supplies Used:
Patterned Paper: Bella Blvd
Stickers: Bella Blvd
Feather: Bella Blvd
Black Pen: Uniball Signo

Friday, December 13, 2013

Pebbles "Front Porch" Layout for The Scrapbooking Studio

From the moment I laid eyes on the Front Porch Collection from Pebbles, I love it!  I was thrilled to get to play with it for The Scrapbooking Studio this month!  Here's my first layout using it:

The flower on this page is a Samantha Walker file.  It is a big oval with a flower but I opted to tuck part of it into my patterned paper.  I contemplated filling parts of the petals in with patterned papers but the more I looked at it, the more I liked the negative space with the flower.This is such a fun line full of pretty stickers and papers...perfect for a sentimental layout like this one!

Supplies Used:
Patterned Paper: Pebbles
Stickers: Pebbles
Wood: Studio Calico
Enamel Dots: Michaels
Staples: Tim Holtz
Washi Tape: My Minds eye
Cut File: Samantha Walker

Wednesday, December 11, 2013

Flower Girl Layout

Today I have a layout to share that features one of my favorite pictures of Lucy.  This is from a few years back, and yes, I have scrapped it before.  But Momenta said they were looking for something sophisticated, using their die cuts....this photo just jumped at me as the way to go!

The paper I used is a distressed looking dark grayish almost black...it's got a unique hue to it.  I die cut flowers and leaves to create my border along the picture and then added metal flowers on top.  I also used metal bars along the top and bottom (I've never been able to figure out what to use those for....score!).  A simple title and sticker are the final touches.  The sticker reads: "The Best is yet to be."  Best is written in a metallic silver....doesn't matter how many times I shot it....it always came out fuzzy!  

If you look closely at the photograph you will notice that there is more to the story than first appears (thus the sticker "the best is yet to be.")  Lucy was an excited three year old flower girl.  She went down the aisle once and waited for everyone else to get there.  Once they arrived she turned and went up the side aisle to the back of the church to do another round.  This picture is of her on the second round (thus the bride, groom, and father of the bride are up front with the minister).  What a fun moment that we will always remember!

Supplies Used:
All Supplies used are from Momenta

Tuesday, December 10, 2013

Reindeer Holiday Decor

On a recent shopping venture to IKEA, I found these cute frames and sna
gged a bunch to create some home decor goodies.  Although I had orginally set out to use these reindeer cuts on patterned paper and slide them into the frame...I thought I they looked very cool completely transparent!

Even better, once I positioned the reindeer on the plastic they stuck there so no adhesive was necessary.  This means that once I am done with these for the season, I can cut out some cute pieces for the next holiday/season!   

These reindeer are very classy and gorgeous on their own.  But since I have four kiddos, I had to add a little red nose and make them into Rudolphs :).  An enamel dot worked perfectly for that!

I've said it before, I love to make my own home decor...it's one of a kind, economical, and 100% to my taste! What have you created this holiday season?

Supplies Used:
Patterned Paper: Doodlebug Design
Die Cut: Samantha Walker


Monday, December 9, 2013

One Samantha Walker Doily: Two Different Projects

My Silhouette Cameo has been getting a workout lately.  Today I have a couple of Christmas home decor projects to share with you that feature the same doily cut from Samantha Walker, but used in two different ways.


For my first project I used the doily in a simple and subtle way, playing up the monochromatic match of the cardstock to the metal doily.  I found this metal doily at IKEA - it is meant to be a candle holder and they carry it in a variety of sizes.  I loved it knew I wanted to use it for a wall hanging.  I added the word "Hope" which is also a cut from Samantha Walker.  I also added the golden pearls around the inner edge.  That was a long, tedious process...but it definitely added the finishing touch I was going for!  

While this piece can work for a holiday home decor piece, it can also work year around!
  
The second project uses the doily in a more complicated way!  I used it as the focal point on this card and weaved some ribbon through the spokes of part of the doily.  Apparently I was in the mood for tedious work...because this was another longer task!  Again, I think it was well worth it though!  I secured the ends of the ribbon and then tied a separate bow using the same ribbon.  This covered up the ends!  I also added an additional twine bow that was a match for the kraft background!    


Some pieces from Teresa Collins "Santa's List" line are the final touches to the card.

Supplies List:
Patterned Paper: Teresa Collins
Ribbon: CutCardStock
Chipboard: Teresa Collins
Cardstock: CutCardStock
Pearls: Want2Scrap

Friday, December 6, 2013

Get Well Card

It is cold out there today!!!!  How about a sunshiney card to brighten things up?
About a month ago I had the idea to use Doodle Twine in a way that I haven't seen before: using it to make it look like a spring (or curly q ).  To do this I simply used some fabric stiffener and dipped the twine into it.  I then wrapped it around a pencil and let it dry.  I have used it a few times on different projects and I love the different dimension it adds.  I am a huge fan of cute monkeys and this little monkey Doodle Pop was exactly the right addition for the bounce element on this get well card.

I used a card from the Doodlebug Create a Card line. I love the details in pattern and shape on the Create a Card line, perfect for adding a lot or just a little, depending on your style!  The only tricky part was finding a way to stand it up to photograph...thus the orange cardstock on my big picture....I used it to stabilize everything :)

Supplies Used:
Card Base: Doodlebug Design
Twine: Doodlebug Design
Washi Tape: Doodlebug Design
Stickers: Doodlebug Design
Fabric Stiffener: Helmar


Wednesday, December 4, 2013

Santa's List: A Teresa Collins Layout

Apparently I am in a Teresa Collins mood because  I got more of her stuff out to play with last week.  She was our sponsor at Kiwi Lane Designs last month and I still had plenty of her Christmas goodies to use up!  

A couple weeks ago, I took little Bo in to get his picture done at Center Street Portrait Studio .  I picked up the pictures yesterday and couldn't be more pleased with them!  So I decided I would scrap one of the 4 X 6 sized ones last night!  I absolutely love how she caught the twinkle in his eye!

I layered a variety of pieces from Santa's List incorporating chipboard pieces, photo corners, sequins, and enamel dots from the line.  Usually I am aiming to tell a story with my layouts or to record a memory.  This time was a little different.  My goal was to let the picture really shine and create some beautiful elements around it. This is a layout where there isn't a lot of story behind it, it's just a pretty picture put together with pretty pieces to make one piece of art.  

Supplies Used:
Patterned Paper: Teresa Collins
Chipboard: Teresa Collins
Enamel Dots: Teresa Collins
Sequins: Teresa Collins
Photo Corners: Teresa Collins
Ric Rac
Cardstock: Momenta

Tuesday, December 3, 2013

You Are My Happy - a Teresa Collins Layout

My schedule has been jam packed with mom/church/family/teaching responsibilities.  I knew that was coming so I worked ahead on all my design team projects so I wouldn't have to rush those.  Because I did that, I have barely scrapped in weeks.  Yesterday I knew that my brain needed some creative time - so I planned to work for a bit after the kids were in bed.  I came up with this fun layout!

I really enjoy playing with Teresa Collins lines and this one "You Are My Happy" was no exception.  She is out of my ordinary loves of bright colors and clean lines...but her stuff always comes together for me quickly and in a project that I am happy with!  I love the oranges, corals, and golds in this line.  It is so different from anything else out there and has a warm, happy feel to it.
 I worked vertically on this layout....starting with the chipboard border and then working my way up.  Each line offers a different texture or interest to it.  Her chipboard pieces combined with little wood hearts add plenty of dimension.  This photograph was taken last month and I thought it would be fun to get it documented quickly while they are all still this size.  The little two change so much each month!  It was a cold day but the kids took really good pictures...which I never would have predicted :)

To create my list of names I used different thickers in different fonts and colors.  I also added some gold hearts from the Stardream Metallic line from CutCardStock.

Supplies Used:
Patterned Paper: Teresa Collins
Stickers: Teresa Collins & American Crafts
Cardstock: CutCardStock
Wood: Studio Calico

Sunday, December 1, 2013

Baby Boy Layout

I have been playing with Momenta's new nestable stamps....they have them in frame shapes and scallop (doily like) shapes.  They are super fun!  I used some of those to create the background of this layout about Bo.
I just started stamping and created a collage of the frames.  I added my pictures where I wanted them and then just added some simple embellishments.  With a busy background, I knew I didn't want to do too much!  Aren't those wood gears fun?  Those are another new product from Momenta.  I can't believe how big this little guy has gotten already!  This was over a year ago!

Supplies Used:
Patterned Paper: Momenta
Wood Gears: Momenta
Stamps: Momenta
Stickers: Momenta
Washi Tape: Bella Blvd

Tuesday, November 26, 2013

Thanksgiving Place Setting using Happy Harvest from Doodlebug Design

One of my very favorite layouts that I have created to date (check it out here) was one that used pieces from the Happy Harvest line from Doodlebug Design.  I still had quite a bit left over so I decided to use it to get crafty with some Thanksgiving goodies!  I created several pieces to use as a table setting, including a napkin ring, a gift bag, and card.  This was ridiculously fun to create and how great is it that my new dishes match it perfectly too ;)!

 This napkin ring was created using some burlap, a Pixie, pieces from the mini flower set, and some cardstock stickers.  The Pixie is perfect for holding it all together.  I love the look of burlap but find it to be a pain to use because it frays so easily.  Before I put this together I covered all of my burlap (except the fringe) with Fabric Stiffener and Draping Liquid from Helmar.  This made it way easier to work with and prevented fraying.  Huge find right there!!!

My favorite thing about this gift bag is that I actually used a mini card folded over at the top. 

The last piece of the setting is a simple card, perfect for writing special notes to each person around the table.  To tie all three pieces together I used more pieces from the mini flower set.  I also created some more curly q's to go on this...don't they look pretty with a flower?  I think I am officially hooked on creating those and finding fun ways to use them :).  If you are interested in how I made them you can find the tutorial here.

Happy Thanksgiving!!!

Supplies Used:
Mini Flower Set: Doodlebug Design
Patterned Paper: Doodlebug Design
Pixies: Doodlebug Design
Twine: Doodlebug Design
White Pen: Uniball Signo
Burlap: Hobby Lobby
Stickers: Doodlebug Design
Cards: Doodlebug Design


LinkWithin

Related Posts Plugin for WordPress, Blogger...