Tuesday, September 29, 2015

This is My Happy!

This week's theme over at JustNick Studio is Boys2Men!  Perfect for me as I have three boys! Doing projects about boys takes a little different approach and sometimes some added creativity to make the supplies at hand work.  JustNick has tons of awesome files that are perfect for boy layouts!
The String Circle Background looked fun and I decided to incorporate that into a grid design.  Because it is a busier file I decided to cut it just in white so it wouldn't overwhelm everything.  I think this approach helps it add a nice punch to the layout - especially up against the vibrant colored squares! I busted out my Doodlebug Design Stash to use throughout the layout!
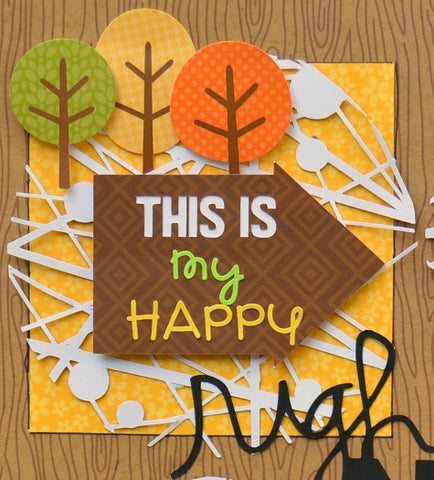
I used one of the boxes to house part of my title and the Arrow Set 1 was perfect for adding some uniqueness to my title. I wanted to give the whole layout a fall feel without making it completely about the season.  I added in some tree stickers as well as some little woodland critters and acorns.
I just love how the white string art circle pops against the blue!
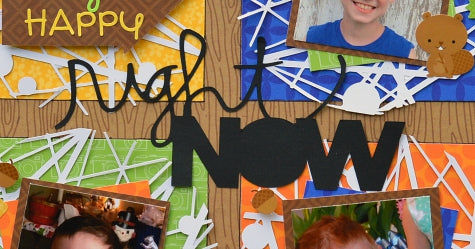
My title needed to be something bold to stand out amongst everything else.  The fonts on this Right Now Script were perfect and combined with black had the pop I was hoping for!  
Stay tuned the blog all week for more masculine inspiration from the team!


Thursday, September 24, 2015

Making a Tickler File using SRM Sticker Supplies

We often use our paper craft supplies for fancy, fun, and whimsical creations.  But every once in a while we find a really sensible use for them that will enhance our everyday life.  Today I am going to show you how I used supplies from SRM to create a new filing system! What!?!  Yep, a filing system, with paper craft supplies! 

Our family is busy and with four kids, I have to be organized or things get ugly.  One of my biggest weaknesses is having too many piles of paper work.  Bills, invitations, school newsletters, they take over fast.  And then I can't find anything!  So when I saw this post recently on creating a "Tickler File" on Home Solutions 101.  The basic idea is to jog your memory on upcoming events, tickets, bills due, etc.  Click on the link and it will take you right through how to set it up! It's a system I knew would work for me so I got right to creating it!  

Using Number Stickers and Calendar stickers are the obvious part and SRM has a variety of them available in the Calendar section of the store.! I used months from the Year of Memories Sticker Set. My numbers But wait til you see how I made the file tabs!

The new Wafer Thin Die for the Decorative Calendar Sticker works perfectly!  I cut enough to make tabs for 31 days and 12 months.

Running it thru a xyron machine allowed me to have a strong adhesive when I secured it to the file folders. 

So there you have it!  Just another way to use those paper crafting skills and supplies for something that came make your life even better!

Friday, September 18, 2015

Vintage Ribbon Flower Cards

The new ribbons from SRM are so pretty and have great patterns.  I thought they'd be perfect to play with on cards and I'm gonna show you a different way to use them than just tying a bow!  Today I have a couple cards to share with you that are similar but use different elements!


I used a metal die in a scallop flower shape to create some negative space on my card.  I then backed that with some of the Black/Pink Vintage Floral Ribbon.  To decorate the card more I used several different pieces from SRM Stickers! I cut out the center of a White 4 inch Doily and used that to surround the original flower.  I also used some twine for a bow.  We have all varieties of twine so there is one to match all of your needs!  On this card I used Pink Sorbet.  My sentiment is from the Thank You By The Dozen Sticker Set and is set on vellum to add to the soft feel.


As you can see this card is very similar but set to a different color scheme! I used the Turquoise Vintage Ribbon for this card. The Ocean Twine was a great Match for this! The variety of ribbons are so fun, you could easily make a set of different cards using all the different ribbons.


I also used it to line the punched border on this card.


This is what the back side looked like before I covered it up to make it more presentable!

Supplies Used:
Cardstock: Core'dinations
Flowers: Petaloo
Flower Die: Darice
Ribbon: SRM Stickers
Vellum: Core'dinations
Stickers: Core'dinations
Twine: Core'dinations


Thursday, September 17, 2015

First Glasses Layout

My Oldest Son recently got glasses for the first time.  On the same day he got them my kit arrived from My Creative Scrapbook and I decided to use some of the more masculine elements in it to create a layout with pictures from that day!
There were a lot of elements in the patterned papers that had diamonds to them so I decided to play off of that and do some fussy cutting and stitching.  I always love how an overlapped picture looks - so I added in that element as well!  The original picture had colors that didn't even come close to matching the papers included so it definitely needed to be converted to black and white.  The gold accents, glasses, and flair all came together to add a good combination of different textures and interesting elements.

Wednesday, September 16, 2015

Summer Adventures

I had a couple of Summer Adventures from the summer of 2014 that I hadn't yet gotten documented! I decided to use my Creative Kit from My Creative Scrapbook to do those!  First up is a layout about our trip to Pop's on Route 66 in Oklahoma!

The kit includes some fun ribbons and I decided to use those as stripes on the layout!  I also love the ephemera die cuts that came in it and those really are a focal point on this one!

My second layout is about a trip to Indiana Beach!

This one highlights more of the ephemera die cuts as well as the patterned papers being showcased in the banner!  I really love how this one came together!  And I am so thrilled to have two more layouts created for last summer that feature multiple pictures!

Tuesday, September 15, 2015

Shooting Hoops Layout

I recently picked up So Rad from Simple Stories and have been enjoying playing with it!  It's really geared at the older boys in your life so I knew it would be perfect for stuff about my oldest!
Last week I needed a brain break and this is where this layout came from.  I pulled out some pictures from a few years ago and went to town with the collection.  I love how easy it is to put layouts together with Simple Stories products - there's good variety in each collection that makes the process so enjoyable!  My favorite part on this collection is the overlay I put over the top of the pictures!  I also love the clipboard background - so fun!

Supplies Used:
Patterned Paper: Simple Stories
Stickers: Simple Stories
Overlay: Simple Stories
Enamel Dots: My Mind's Eye

Monday, September 14, 2015

Little Girl Layout - My Creative Scrapbook

Today I have a couple of little girl layouts using the Main Kit from My Creative Scrapbook.  The colors in this kit are rich and beautiful and perfect for sophisticated girl layouts!
For this one I did a lot of fussy cutting!  I cut out the banner and I also cut out the butterflies.  I wanted to really highlight some of the different elements available in the kit as well as the beautiful patterned papers.

This one also contains lots of fussy cutting!  To decorate the top of the layout I used a variety of hearts - some punched, some stickers, and some fussy cut.  I added in some gold sequins to highlight the gold foiled paper from the bottom and layered several different elemnts from stickers to brads!


Wednesday, September 9, 2015

Music I Love - My Creative Scrapbook

It's been a while since I have added a new layout about myself.  Considering the main line in this month's Main Kit from My Creative Scrapbook is called "My Story," it felt appropriate to do one with it!  This month I did the topic of Music I Love.  It could have said Songs I love, but I didn't have enough of the letter S left in my alphabet ;).
I like all kinds of music but my favorite is Christian music and hymns....so the list may be very unfamiliar to you if you don't know that genre well.  Some of the songs have deep personal messages that I can/have related to and some are just beautiful worship pieces.  And there's one Taylor Swift one thrown in just for kicks.  

I printed out my text and it's not big enough to read!  Live and learn....so here's what it has on the list:
He is Good by Nichole Nordeman, Hold on to Jesus by Erin O'Donnell, I Will Carry You by Selah, He's my Son by Mark Schultz, Held by Natalie Grant, Greater by Mercy Me, Turn Your Eyes upon Jesus (the hymn), Oceans Deep by Hillsong United, Worn by Tenth Avenue North, Jerusalem the Golden (the hymn), Don't you Ever Grown Up by Taylor Swift, Now the Light Has Gone Away (the hymn), Grant them Peace by Fernando Ortega, How Beautiful by Twila Paris, Sent Forth by God's Blessing (the hymn), We Praise You and Acknowledge You, O God (hymn), It is Well with My Soul (hymn) - Any of those your favorites too?  

The layout itself was pretty simple.  I loved the quilt styled paper and wanted to use it in a bold way - so I added yellow cardstock down the center to settle it down a bit.  A circle and some banner stickers surround the picture along with some pocket pieces and embellishments!  Very clean & simple but still busy with the different patterns involved!

Don't forget to check out all the kits this month from My Creative Scrapbook!

Saturday, September 5, 2015

Back to School Layouts - My Creative Scrapbook Reveal

It's the 5th!  That means it's time to start sharing projects I created using my kits from My Creative Scrapbook this month!   Today I have two to share that are Back to School Layouts and make use of the Creative Kit!
The Creative Kit is full of the new Happy Traveler line from Imaginisce and other fun coordinating goodies from American Crafts, Maya road, Basic Grey and more!  It's great for your summer travel layouts but it's also packed with primary colors, making it perfect for Back to School Layouts!

I thought it would be fun to use the map paper in a big way!  So I did a very simple layout for this one - adding my pictures right in the middle.  I then cut up a pocket page element to use for the Yellow Subtitle. I added my title in a circle around the pictures to really highlight the map and pictures.  A few simple embellishments and that was all this one needed.

This one also was fairly simple aside from the String Art.  I envisioned doing a big 5 in string art in back to school colors.  The graph paper gave me a perfect base for that.  After I traced and stitched my five, I went ahead and filled it in with very random string art.  It is a bold but fun element to add!  I added in pictures and chipboard words.  I colored the chipboard words with gelatos.  My blue one is a little splotchy.  I'm not sure why, other than it was an older gelato.  Nothing I could do to change that so we just used it :).  I also added a few brads and die cut pieces.  I added in handwriten words throughout that are things that he loved in 5th grade. Sort of nice to do this one looking back because then I can include some things that happened last year!


Thursday, September 3, 2015

Adding Color with Gelatos

How about an idea on how to add color to some of the Noir ColorWays paper!  Ever since I first laid eyes on this feather paper I wanted to color it!  So for this birthday layout I did just that! Here's what I shared over on the Paper House Productions Blog today!


You could try a number of different things to add color to these black and white papers.  You could watercolor paint them but it will probably warp a little.  You could use some colored pencils or markers and add color.  I went for Gelatos - which provided the look of watercolor paint without the water!


I picked out colors from my picture and then used those as my choices. I didn’t color every feather because that would have made things too busy.  Once I was done with the coloring, I knew it was still pretty busy, so I cut out a circle of vellum and added that to the center where my picture would go.  That helped calm down that central area a bit.  I then stuck with mostly black and white accents also.  There are a lot of possibilities here with Noir and Gelatos!  You could go for an ombre look that would be beautiful or a rainbow or even make it have seasonal colors!  Love what a diverse line this is!

Supply List:


Tuesday, September 1, 2015

Birthday Boy - a JustNick Layout

The creativity just keeps flowing with the fun backgrounds from JustNick!  Today I am going to share with you how I used the Twilight Zone Background on a birthday layout!  I seem to be most drawn to her circular backgrounds - which I suppose makes sense because I love including circles on my layouts!
I always get a little nervous when I cut something this detailed!  It takes awhile to cut and if it gets messed up, who wants to start over.  The good news is this cut perfectly on my very first attempt!  I had thinner cardstock so I set my blade at a 3 and it didn't tear.  
I backed each line of circles with a 3/4 inch strip of patterned paper. That fit perfectly without any overlapping.
To help draw the eye in even more to the pictures I did some hand-stitching.  I connected three circles with stitching and it really changed the look of the design!  Because of all the busyness I kept things very simple from there, just adding a few stickers and a title.
We got some brand new designs over the weekend - make sure to check them out and snag them to play with this week!

LinkWithin

Related Posts Plugin for WordPress, Blogger...