Thursday, February 25, 2016

Scrapping Our Stash - Family Selfie Layout


It's time for another Stash Busting Blog Hope with some of my talented friends!  I love breaking in to my stash just for fun and creating something to share with y'all each month!  I have a giveaway to share at the end of the post!

Here's this month's Hop List
Christine http://scrappingwithchristine.blogspot.com ***You Are Here***

*******************************************************
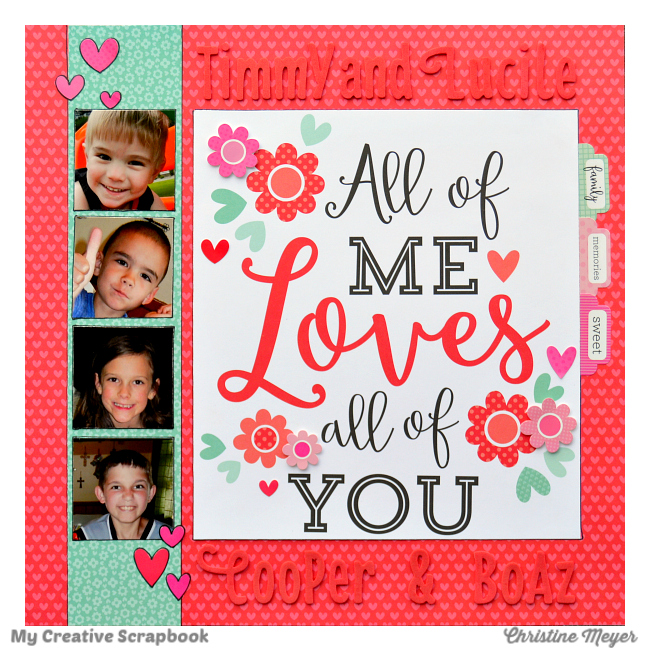
Today I am going to show you a layout that I have been wanting to make for a while!  I have had the "Just Add Color" Collection from Bella Blvd for quite awhile and I just haven't had the chance to play with it.  I'm on a bit of a rainbow kick so I worked that into the layout!
One day last week when I just needed to do something for myself, I decided to pull out this collection.  I had this family selfie from last fall - the colors in it were awkward so I made it black and white.  And although some parts of the kids faces are missing, I think you can see the happiness in everyone's eyes and expressions.  I cut a title out from the colllection and then really dug into my stash.  I pulled out borders from all kinds of Bella Blvd Collections and layered them in rainbow order.  I did some coloring in on the hearts surrounding them and then added a few embellies to draw the eye into the picture.  It turned out fun and vibrant!

********************************************
As I mentioned earlier I am doing a giveaway!  Today I am giving away a $15 Gift Certificate to SRM Stickers!  You can get stamps, stickers, containers, planner supplies, and so much more there!

You can get up to two entries for the gift certificate:
1) Follow me on Instagram @cameyer71
and/or
2) Follow me on Facebook
and then
3) Leave me a comment here telling me what you did!

The giveaway will be open thru March 6, 2016 at 11:59 PM CST

The talented Sandy is up next - hop on over there to see her creation!

Wednesday, February 24, 2016

Rainbow Scrapbook Layout

So excited to join you today with a colorful layout about my bright and cheerful littlest boy!  This layout is highlighted on the Doodlebug Design Blog and is part of our Swiss Dots Challenge! The Swiss Dots Petite Prints are double sided and available in so many fabulous colors! And of course they coordinate with all the fabulous Doodlebug embellishments.  You simply can't go wrong with any color you choose! I decided to go for a rainbow effect.

I cut out my circles and then layered them one onto another.  This took a little time but wasn't too bad since I used a Silhouette Cameo to get the job done. I then started trimming out pieces and adding in my quote. I love adding meaningful, unique,and timely quotes to my layouts - I think it makes them a little more personal.

Teensy Type Letters coordinated perfectly in all my color choices and made for a whimsical title! It took a little patience to put it together but I knew the time was going to be worth it! Using multiple colors ensured I wasn't going to run out of any of the letters I needed! 

I can't get enough of all the different Sprinkles available from Doodlebug.  I used both arrow ones and circle ones throughout to break up my circles and add some movement to the layout.

My final touch was adding a small tag topped off with a cute little monster Doodlepop.  I debated on which Doodlepop to use there, but a toddler and cute monster seemed like the perfect combo! Because as well know toddlers are cute little monsters too!


Tuesday, February 23, 2016

Heart Background Tutorial

I finally have my last Main Kit layout from My Creative Scrapbook to share with you today.  I am up on their blog with details on how to make this page and I'm going to show you how I made the heart on this layout using just some ink, scrap paper, and a pencil!


I loved the striped paper in this Main Kit but I wanted to do something different with it.  So I decided to create a unique heart!

Use some scratch paper and cut out a big heart.  I used washi tape to secure it to the center of the paper.

Sorry for the blur on this one....no way to retake it or I would have!  But you get the idea from it anyway!  Use the eraser on a pencil and your ink pad and begin making random dots coming out from your heart.  Random is the key here!

Add the dots all around the layout - filling in more where you see the need. Then take your scrap heart off and you have a beautiful one of a kind outline!  I added in some stitching but other than that I didn't have to do much!  Super easy and very unique!

Friday, February 19, 2016

Basketball Layout from CHA

This past December I got to work with some of the new collections from Paper House Productions for their CHA booth.  This is one of those layouts!   I have a son who is absolutely obsessed with basketball so I was especially drawn to this collection. 
Basketball Layout
Basketball Layout Supplies Used
I was immediately drawn to two papers in this collection - the blue starburst and the overlapping basketballs. So of course I combined the two to create a layout! I fussy cut out a basketball and stuck that right in the middle of the starburst. It makes a bold, eye catching statement! If you look closely too you’ll notice my sons arm looks like it’s reaching out to the ball!
Basketball Layout Closeup 1
I tucked some stickers behind and in front of the picture of him. My style always includes using lots of words on layouts. The collection included plenty to choose from and I resisted the urge to use every single one!
Basketball Layout Closeup 2

Have you checked out the new collections from Paper House? They do not disappoint!

Click on any of the Thumbnails below to shop for these Items!
p-2047th  stcx-1011th_4  p-2048th

Thursday, February 18, 2016

Bible Journaling on 2 Timothy 1:7

Have you had a chance to try out stamps for Bible Journaling yet?  I have been enjoying playing with SRM Stickers new Bible Journaling Stamps! I heard this verse multiple times last week and decided to spend some time creating and reflecting on it.   Everyone has a different approach to the Bible Journaling, some do it right in there Bible and some do it on a separate paper.  Some just journal about the verse, some do just the verse, and some do a combination of both.  You'll find that I like to do it on separate paper and I do a mixture in my approach.  If I know the journaling will be personal but I'd like to share the final piece, I put my journaling on the back!  For today's project I focused on 2 Timothy 1:7.

I like to use Watercolor paper as my base - that way if I decide to use water it is a little less likely to warp.  This time I went for a ton of doodling, stamping, and gelatos.

The first thing I did was stamp "love" using the Big Faith stamps.  And then I wrote out the rest of the verse around it.  I've been dabbling in hand lettering and this time of art is the perfect place to play with it!  The Le Pens are perfect for this type of doodling!  

I thought it would be neat to use the heart from Planner/Notes to Self stamp set as the center of some doodled flowers. I colored it in with my pen!

One point of this verse is that sometimes we have to be bold but it should be done in a loving and disciplined way.  The "Shine Your Light" stamp from the Words of Faith Stamp Set perfectly embraced that message and I thought it was a nice addition to the journaling!

Friday, February 12, 2016

St. Patrick's Day Wreath

It's been a couple months since I've shared a wreath!  Creating wreaths with my paper crafting supplies has become something I look forward to with each new season.  When I got my hands on the Pot O' Gold Collection I knew exactly what I wanted to use it to create! A wreath, of course!


Today I am going to show you a little bit about how I created this very simple wreath!  First off you will need the Pot 'O Gold 6 X 6 paper pad.  Pull out a collection of papers that you like from it.  I went with the greens and whites but it would be beautiful in rainbow too!  

Roll the sheet up like a cone (with one tip sticking out) and secure it with hot glue.  Hot glue is a definite must for a project like this...it has to dry fast and be very secure!

Line up your cones on a 10 inch cardboard circle (I used an old mailing box) and make sure you are happy with the way the colors line up and you are getting things even.  Then secure them to the cardboard.

Take the patterned paper with this beautiful quote on it and cut a nine inch circle around it and use that as the center of your wreath.

Add accents to the shamrocks that are already on the sheet by using shamrock cardstock stickers, the shamrock sprinkles, and some gold coin stickers!  Add a ribbon to the back and you have the perfect piece to welcome guests into your home!


Wednesday, February 10, 2016

Toddler Kisses - Main Kit Layout for My Creative Scrapbook

Do you document those little special memories that can get lost in the shuffle of life.  More often than not I am doing just that in my layouts.  You may not always see the journaling (or understand it) but for me the beauty of this hobby is being able to look back at all the sweet, sappy memories that I have forgotten about.  Today's layout uses the Main Kit from My Creative Scrapbook.  It has a love theme and is perfect for love, but also fit the stories of my little boy's kisses quite well!
There's a lot of little details to this layout so let me highlight those for you!  To make my banner I cut up a zig zag paper - kind of a different twist but I thought it was a neat one!  I then added a row of hearts to highlight the picture - this is a mixture of both ephemera and stickers from the kit.  I love the gold foiling pieces that are included because they add an extra flash to the layout.  And it still works with boys :).  I fussy cut the word "LOVE" out of a pocket piece in the kit.  The "O" came out messy, I didn't cut it well. But that was okay because I used my little guy's head as the O and spelled out "LOVE" straight onto the picture.  I think that's actually my favorite part of the layout!    I colored my wood "XOXO" with some Heidi Swapp Mist.  I'm very impatient on waiting for those things to dry.  That is probably part of why I am not too into Mixed Media, not patient enough!

I'll be back tomorrow with another layout from the Main Kit!

Tuesday, February 9, 2016

#Besties - Friendship Layout & Giveaway Winner

First off I want to announce the winner of the Planner Stamps from my recent Giveaway!  The winner is Trisha Burgess!  Shoot me an email at practicalscrappers@gmail.com and I will send those out to you!

Through the paper crafting industry I have been able to make friends from around the world.  Every once in awhile you just really connect with someone.  That was the case for me and my friend Suzanna.  We met on a team three years ago and have been close ever since.  So it was high time I did a layout highlighting that friendship!
I used the last bits and pieces of my Creative Kit from My Creative Scrapbook to create this one.  I anchored the picture by cutting out a big banner piece as well as tucking a couple patterned papers underneath.  I then created a cascade of flowers, hearts, and circles.  There's a mixture in there of ready made pieces, punching, and fussy cutting!  I also did some outlining with my black pen to help make everything pop a little more.

Tomorrow I'll begin to share projects with the Main Kit!  Still lots of love theme going but a whole different set of products and color scheme!

Saturday, February 6, 2016

So Happy Together - Grid Style Layout

I'm back today with my third layout from the Creative Kit from My Creative Scrapbook!  I went for a grid style layout on this one and tried to play off of the variety of colors in the kit!  Once again it's packed with Doodlebug!

This layout doesn't have anything to do with Valentine's Day but it is about a date that my daughter and I took.  The one picture on it is terrible - but it is part of the story and sometimes you just have to make due with what you got!  I added one picture to each part of the grid and then made a title square as well.  I added in coordinating embellishments as well as punched circles.  Doing some outlining helped me to make everything pop a little more.  My favorite thing about doing grid style layouts is how quickly they come together!


Friday, February 5, 2016

Valentine Layout

The Creative Kit from My Creative Scrapbook this month is packed with Doodlebug Design's Sweet Things Collection.  You've seen a little that I have done with it already and today I am going to share a love layout about my kiddos!
I'm completely smitten with these new 12 X 12 Quote papers from Doodlebug.  Knowing that it was in the kit made it easy for me to hold off using it when I was doing my Doodlebug team stuff!  I imagine I will be using this sheet every month for some project!  It made a good base for the layout.  I added pictures down the side - although I think they'd be lovely in clusters around the flowers too. With boys, and four kids...the three clusters and girly aspect wasn't working for me!  I love the Thickers included in this kit and that I was able to use them a a monochromatic subtitle!  

Hope your weekend is off to a great start!

Exciting News

I know I said this was coming yesterday - but family life had me hopping!  So I am back today to share the news that I am going to be taking on the job as Design Team Coordinator for the Paper House Productions Team!

As you know I have been with Paper House as a designer since 2013!  I am looking forward to this new adventure with them and the fabulous ladies on this year's team!

Thursday, February 4, 2016

You're Just My Type - Valentine Card

Tomorrow I'll start sharing a whole bunch of My Creative Scrapbook Kit layouts but before that I wanted to share one more Valentine card that I made using the Doodlebug Sweet Things collection.
Have I mentioned how much fun I am having with Doodlebug ;)?

I made this at the same time as I made the "lift the flap" Valentines that I shared last week.  I used my craft knife again to trim out the paper and roll it forward.  But since it didn't fit with the other three cards I decided to hold it back and use it here.  Using a craft knife can be challenging and I got a bit of a jagged edge but nothing a pretty twine bow can't cover up!  I also added some of the shaped sprinkle hearts.  I love the sprinkles both in shapes and dots from Doodlebug and am finding I use them on tons of projects!

Later today I'll be back with a little bit of exciting news about my Scrapbooking Career...

Wednesday, February 3, 2016

My Creative Scrapbook - February Sneak Peeks!

It's SNEAK PEEK time at My Creative Scrapbook!

We are so very excited to share our latest sneak peeks with you.

I loved creating with the Main and Creative Kit and I think you will too!

 February Main kit sneak peeks:


And the February Creative kit sneak peeks:


And Bonus! I get to share this layout with you early!  YAY!
I had so much fun doing a string art background and then using the fun Doodlebug pieces from the kit to create this special layout.  I love the texture that hand stitching adds to all the paper and stickers.  This is definitely my favorite layout from that kit this month :)

Now that you have a peek at what's coming, don't forget to reserve your kits :)
Please visit MyCreativeScrapbook.com for more information.

LinkWithin

Related Posts Plugin for WordPress, Blogger...