Thursday, December 29, 2011

i'm up at Momenta today with this layout about "Three Little Meyers."  I took this picture because I was entertained by how Lucy's (middle) size compared to the other two.  The one on the left is 2 years younger than her and the one on the right is only a year older.  I 
think Lucy got my genes when it comes to height!  I have a quick tutorial on Momenta all about how I made the flowers on this pop up.
Momenta Supplies used
Puffy Alphabet Stickers

Tuesday, December 27, 2011

My Top 10 Projects of 2011

I have changed a lot as a papercrafter this year!  I barely made cards or altered projects before this year, now they are a big part of my repertoire.  I made my first manufacturer design teams (Momenta & Creative Charms) this year and also got published for the first time (Cards December 2011).  It's been a great year, join me as I attempt to recap my favorites :)  Thanks to each of you for all your support!

1.  Created this one just for fun using Authentiques Glowing Line.  I loved the diamonds and they fussy cut fabulously.

2. I made this card for my little boys first day of school, it's so fun and whimsical - I love what I did with teh Momenta paper and also all the doodling.

3. I made this layout for a kit feature for Burlap & Buttercups kit club. Love the patterned paper chevrons I made.  

4. I also made this card for the Burlap and Buttercups feature.  

5. This was my first layout as a designer for Momenta, plus I can't resist the pictures of my little boy in his "Son of a Scrapbooker onesie :)"

6.  Made this one just for fun this fall, love that I got so many photos on it but still have some white space!

7. I made this for the Bella Blvd feature last winter here on Practical Scrappers

8. Love all the Jillibean soup goodness and the paperfolding adding dimension.

9. Made this menu board as a project for Momenta

10. A card with a fun dimensional flower made for Momenta


Monday, December 26, 2011

Snowy Top Ten

I hope everyone had a Merry Christmas and is kicking back and enjoying a little down time!  I made this one months ago as a magazine submission, but alas it didn't get picked up and I held it back for it to be more seasonably appropriate.  I'm sitting here hoping for our first big snow...so it seems like the right time :).  I listed out all the things that Lucy loves about the snow and fussy cut some cute little snowmen.  I based my colors on her various outfit colors and I love how it is nontraditional but still works.
Supplies Used: Momenta Patterned Paper and Cardstock, The Twinery Bakers Twine, Cosmo Cricket Letter Stickers, Pink Paislee Letter Stickers, American Crafts Thickers, The Girls Paperie Stickers

Friday, December 23, 2011

Momenta Design Team Announcement

I have loved every minute of my design team experience with Momenta and so with great excitement I share the following news!


It is with great pleasure that we introduce to you the
2012 Momenta Design Team:


So very excited to be sticking around for all of 2012!  
Merry Christmas to all of you!

Tuesday, December 20, 2011

Be Merry, Be Jolly...

I was totally inspired by my fellow Practical Scrapper Audrey's work with the Little Yellow Bicycle Christmas line that I got some myself to play with.  It's very rare that I am that inspired by a specific line...but when I saw what she had done I really wanted to try some of it!  Here's the layout I created.  I love their line of flowers that come with some assembly required, but not too much!  I also absolutely adore those corrugated elements...especially in bright pretty Christmas green!  
Supplies Used: Cardstock is Momenta, Sentiment stickers Momenta, twine is Jillibean Soup,  everything else consumable is Little Yellow Bicycle, Fiskars Border punch

Thursday, December 15, 2011

Altered Charger Plate

If you are anything like me, you are running a little short on time during this busy season.  I direct a children's Christmas musical and that has eaten away at a lot of my crafty time!  I needed a quick gift that still had that "wow" factor.  Sometimes I am just amazed with what you can do with papercrafting supplies and other items you have on hand.  I had purchased a couple of charger plates to have on hand and decided to decorate one of those and make it into a cute winter decoration.  I went with a red plate and used silver letters from Momenta and snowflake stickers also from Momenta.  I measured carefully to make sure my letters were straight and even (quite a task on a circle!) and after placing those on added the snowflakes and gems randomly throughout.  To get started I followed the triangle rule of design and did my big snowflakes in a couple triangles first, then from there it was completely random.  
Found out yesterday that Cards Magazine is going to publish THREE of my cards in their May issue!  Woohoo!!!!

Friday, December 9, 2011

AKA

It has been awhile since I just crafted for myself - I've been working hard on CHA projects and when I haven't been doing that I have been busy directing our school Christmas musical.  I finished up those CHA projects yesterday and decided I needed to do a layout just for fun and it has nothing to do with Christmas!

I've been itching to play with the freebird line from Authentique so I pulled that out and went crazy layering.
The layout focuses in on all the different nicknames we have for Cooper - I put those on different flags throughout.  I used some of my favorite Momenta letters for the Cooper title (I love how they have a childlike look to them!)  I also used some Twinery twine to make an interesting border that coordinates beautifully with Freebird.
Supplies used: Letters from American Crafts, Cosmo Cricket, and Momenta; Paper from Authentique and American Crafts, Twine from The Twinery, Circle Punch from Creative Memories, 

Sunday, December 4, 2011

Candy Cane Wreath

Lucy and I put this fun wreath together.  It was inspired by one I saw on Pinterest.  Of course I had to dig into my stash of bakers twine from The Twinery for the bows (definitely also necessary to hold it together!!!). I like the contrast of the green with the red.  While we were making it Lucy discovered that she thinks candy canes are pretty tasty too!

Saturday, December 3, 2011

Welcome Winter?

Okay winter hasn't taken over here, so I reserve the right to post a summery card! :)  This one is full of fussy cut goodies from Imaginisce.  I used fabulous embossed Momenta paper for my base.  I also added three colors of bright bakers twine from The Twinery.  This card came together pretty quick and smoothly and I couldn't stop smiling looking at those little silly fruits :)

Tuesday, November 29, 2011

Don't Laugh

I try very hard to make the main focus of my scrapbooking to remember everyday moments.  Those are the things I am really afraid of forgetting!  This layout combines a variety of silly pictures of Lucy - but the title is what I really want to remember.  She is a hilarious little girl and is constantly saying things that make us laugh that she doesn't realize are funny.   Then when we laugh (especially when daddy laughs) she says "Don't laugh"  She says it so cute and drawn out.  We always end up explaining that what she said was funny...but she rarely understands.  We are learning the art of stifling our laughs :)

I used an Imaginisce paper full of border strips and cup them up and just started color blocking.  I had a vision and it was a little bit of a puzzle, but their sheets have soooo many great sizes it ended up working out just great.  All the pictures are from last spring/summer so the bright cheery paper was the perfect fit!

Supplies Used: Patterned Paper Imaginisce, Letter Stickers from Momenta, Bakers Twine from the Twinery

Monday, November 28, 2011

Imaginisce Fall Layout

I've been busy working on magazine submissions and CHA projects...so I do not have a ton to share right now. But I do have a layout I made using some Imaginisce goodies!  It feels weird to post a fall layout now, but I'm doing it anyway :)
I wanted to try slanting some border strips just to see if they would add a different feel to the layout.  It's not something I'd do all the time, but I like that it adds a unique and graphic look to things.  I also trimmed the ends of those all differently and curled some of them up.  I created my border using tiny little torn strips for a mosaic look.  I also tried to highlight everything with a bakers twine heart.  You know me, I love that bakers twine :)!  I did my journalling on the little tags talking about all the things that I am thankful for about Lucy. 

Friday, November 25, 2011

Fall Coasters

I've been making coasters again!  This time I decided to try two layers of paper and added some gems using the I-rock tool made by Imaginisce.  I also wanted to make them seasonal and used some pretty fall paper from Imaginisce.  
I absolutely love how they turned out.  The only thing I would change is that I would do them all with monochromatic gems next time.  I thought I'd like the contrast of the orange and teal as seen in the top left one, but I actually prefer the teal on teal of the next one.  Lesson learned for some Christmas ones :)  In case you are interested here's links to my Momenta coasters and Authentique coasters.

Tuesday, November 22, 2011

Studio Calico Cards

I didn't have a chance yet to share the cards I made for my Studio Calico feature over on Practical Scrappers.  I made both of them while at an all day crop so I was working completely with the kit and what I had on hand.  


I really like using gray and pretty much any other color right now :)  And in case you haven't picked up on it...I'm totally into manila tags too!  Seriously, I need stock in those things!  I used washi tape on both cards, this was only my second time ever using washi tape!  It's fun and adds some interesting texture.  I like that you can tell these cards came from the same kit but still have their own style.

Sunday, November 20, 2011

Momenta & Epiphany Crafts Swap


I am participating in my very first product swap with Momenta and Epiphany Crafts this week.  I got to use the Shape Studio Round 14 Tool.  This tool allows you customize your own epoxy bubbles in just a matter of moments.  I wanted to show just how versatile this little thing is so I have created a variety of projects to share!  I love to make every project that I create have a unique element to it - this tool is perfect for that!

First off I used it to make the centers of these fussy cut flowers.  I decided to keep my centers all the same color but I love that it adds some dimension and makes them my own style of flowers.  Plus, no searching for an embellishment for the center that matches just right...I made my own!


*********************************
These little round bubbles were screaming Christmas ornaments to me.  I knew they would be an easy and cute way to decorate some simple ornaments.  I picked up these plain plastic ones from Michaels.  I have three kids and each year we give them a new ornaments - so for this year I made them each a different one that says "Joy" using Momenta letters and the shape bubbles.  I used paper from the "All Through the Year" paper pad as the background for my bubbles.  I loved how easy it was to line up the cute little stars inside the shape tool and make them work in my bubbles.  I then added a little glitter into each one that matched the colors I had used.
 For this first one I used some Design Your Own Stickers and the bubble for my "O"

Here I made my "O" using the shape bubble and the silver metal setting.

 For this last one I used the bubbles to add some extra color and interest.
***********************************

My last creation is a bright and cheery layout starring the Free to Be Me line and the shape bubbles housed in the metal settings from Epiphany Crafts.  This paper did not need a lot added to it so some simple handmade flowers topped by one of a kind centers were the perfect embellishments.
You can't go wrong with this versatile and fun tool!  I'm excited to see what the other designers come up with this week...you'll have to check in at Momenta to see too and get yourself entered to win the Epiphany Crafts prize!  You can also check out the Epiphany Crafts blog and see what their designers made with our stuff!

Supplies Used:
Epiphany Crafts: Shape Studio Accessories Bubble Caps Round 14Shape Studio Tool Round 14, Round 14 Silver Metal Settings

Wednesday, November 16, 2011

Washi Tape Card Challenge

I didn't think I was going to get a card done this week for the Cards Challenge...life has been busy!  But I managed to squeeze one in.   I used the brand new line "Gathering" from Authentique.  It has a gorgeous combination of colors including brown, teale, and orange...so fabulous!

The challenge was to use washi tape, not a favorite supply of mine.  I twisted mine up and then used it to form a heart shape which I echoed with bakers twine.

Supplies Used:  Bakers Twine from The Twinery, Washi Tape from Studio Calico, Kraft Cardstock, and everything else is from Authentique

Tuesday, November 15, 2011

Echo Park Projects

I've been playing a lot with Echo Park goodies so I thought I'd throw my hat in for this month's Fresh Face Designer Call. to do so I needed to submit three projects with instructions....so here goes!

I really wanted to use the Splash line...but I wasn't up for scrapping something summery.  So I made the Splash line work for snow!  Those swirls totally can work for a wintery gust and the colors are bright and fun for a little boy.  It was fun to look at this line thru a winter lens!  
In addition to the Splash Collection I also used papers and stickers from the Little Boy Collection.
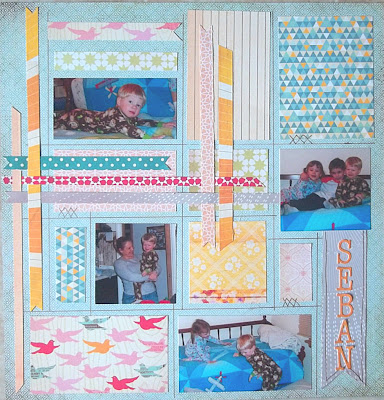
I began by cutting out tags in orange and brown to use as a base layer
-I hand cut a couple of circle shapes in blue and orange and used those as a second layer before putting down my orange matted pictures
-I punched a whole bunch of snowflakes in orange, brown, and green and used foam dots to pop those up on the swirls.  I added some gems to the middle of each of those.  I also placed a couple of snowflakes down by the pictures.  You'll notice that my bottom brown snowflake on the swirls and the two surrounding the pictures form a triangle - helping to draw in the eye to the photos.
-I fussy cut the flag and also popped those pieces up with foam dots.
-Lastly I cut out words and a title.  Instead of journaling I decided to use a few fun and fitting words matted on little banners.  The sticker for the title originally said "A little dirt never hurt"  I cut it in half and took out dirt and replaced it with Snow and Fun!
My goal in this layout was to create something totally unexpected with an older line - I think I achieved that and it was a fun challenge!
***********************

My next creation again used the Splash Collection and the Little Boy Collection
I had a seen a reindeer tag on pinterest that used stars for ears and filed it away to try.  Now that I've done this once I'm gonna have to do more with my kids!
-I cut a tag from brown paper
-I cut two stars on my die cutting machine that are about 2 inches tall.  I used yellow but then inked them up with some brown so they weren't quite so bright.
-I hand cut an oval for his yellow nose base (what do you call that part on a reindeer? If you know, you should probably be on Jeopardy :))  I also inked this up.
-I doodled some outlines on both the yellow parts too, just to add a homemade touch.
-I added googly eyes and ribbon for a scarf and lastly wound up some bakers twine to make his nose.
Super easy and fun!  I can see the kids really making these their own!
*********************

My last creation is a card using the Little Boy Collection and Little Girl Collection
I love the Autumn feel to this color combination!
-I cut 1/2 inch strips from the green, brown, orange, and purple papers.  
-I cut those down to all the same height and started laying them down.  It fit together mostly although I needed to add smaller pieces in just a couple spots.
-I filled in the holes with punched hearts
-I added some bakers twine to make it look like a wrapped package and topped that off with the "I Love You" sticker that is popped up on foam dots.
-I then matted my whole card with the brown paper.

Hope you've enjoyed!
Christine


Monday, November 14, 2011

Tis the Season

Okay this one was super hard to photograph with all the metallic!!!  I used my favorite border punch again and created some ruffles using more of that fabulous Black Tie line from Momenta.   The challenge at Practical Scrappers was to use some old stash for a Christmas project.  I used some really really old holly stickers to add some extra Christmas kick to it.  I also finally used up some really old red bling! And of course it wouldn't be a project from me if it didn't have Bakers Twine from The Twinery on it! 
Supplies Used:  Letters and Paper from Momenta, Gems from Hobby Lobby, Bakers Twine from The Twinery, Stickers from Doodlebug Design

Sunday, November 13, 2011

Wedding Layout for Momenta

First of all the winner of my Momenta sticker giveaway:
Lillian Child send me an email at practicalscrappers@gmail.com!

I'm up on the Momenta blog today!  I had my choice on what to create and decided to with a layout this time and feature one of my favorite photographs ever.  Last year my little girl was a flower girl  for my brother's wedding.  After going down the aisle once, she decided she hadn't had enough.  She crept up the side aisle and went all the way to the back of the church and as the ceremony was beginning she went up the aisle again.  It was one of the funniest and sweetest moments that day and the photographer managed to catch it (you can see in it that the bride is already up front being given away by her father).  This layout is titled "Sweetie times Two" to commemorate her making two trips up the aisle.
I started off with some black textured cardstock and distressed the edges with sand paper.  I then punched a whole bunch of black hearts and glued those down in lines.  I love the added texture of the white core cardstock from Momenta.  I used a piece of patterned paper from the Black Tie Metal Paper Pad as my next layer.  The picture is matted in green cardstock.  I used the same cardstock and punch border strips but made them a little longer and used them to edge the picture on one side.  I added part of a scallop frame from the Kalieidoscope kit on the other side.  Finally I added the "Sweetie" (ST 3602) title.  I cut the word "times" from vellum stickers (ST 4917) and two is spelled out from puffy alphabet stickers.  The title is topped off with a whole bunch of little heart stickers (ST 4938)

Wednesday, November 9, 2011

Studio Calico layouts

I have a Studio Calico feature up on Practical Scrappers today.  Here are the three layouts I created:
Still loving that triangle punch and absolutely love this layout!!!  I inked the edges of each and every triangle and glued them all down.  I highlighted a few with dashes - who knew grey and yellow and teal would go together soooo nicely!  I even misted on it and don't hate it!

I was going for a funky grid on this one...eh, just eh.  It's fine but a little haphazard for me :)  It was worth a shot right :)  What do you think?

Had fun doodling and scattering things about on this one and love that really old pic of my Lucy!  

Soup Spotted!

Got Soup Spotted for the card in the next post!  A first time feature on a manufacturer blog that I don't design for!  Sweet!

Tuesday, November 8, 2011

Wood on a card

The challenge on the Create blog this week was to use wood on your card.  I decided to go with popsicle sticks and work them into some paper weaving.  I had fun playing around with all the Jillibean goodies that I just picked up!  Pretty clean and simple card but satisfying nonetheless!
Supplies Used:  Everything is Jillibean Soup!

Monday, November 7, 2011

The two prettiest girls...

This is another one of my creations from the crop last weekend.  I had picked up this paper from My Minds Eye and stickers from We R Memory Keepers....they matched together so beautifully.  I took it along so I could use it and I love how it came together.  It doesn't hurt that the subjects are fantastic too!

Hey if you haven't already liked Momenta on facebook....they are trying to get to 2000 fans and they'll do a big giveaway when they get there.  I would love it if you would head on over and tell them I sent you!  If you click on Momenta above it's linked right to there facebook page!

Sunday, November 6, 2011

Drama Queen

Lucy and I did a little photo session and she gave me all sorts of silly poses to choose from.  She is one dramatic little girl so this cute title from Momenta was perfect!  I have been saving the Amy Tan silhouette waiting for the perfect layout to use it on and it combined with the crown was perfect.  This layout combines so many things I love: Lucy, Momenta, Bella Blvd, and bright colors!  Used up some stash stickers in this one so I am entering it at Burlap and Buttercups!
Supplies used:  Patterned Paper: Momenta & Pebbles, Stickers: Bella Blvd, Momenta, American Crafts, The Twinery Bakers Twine

Saturday, November 5, 2011

A boy's story...

I went to an all day crop last weekend.  There were about 60 people there raising money for a local school!  They had a layout contest and gave you the striped paper (one of my layers) to create with.  I combined it with some fabulous Echo Park and ended up winning the contest!  
Supplies Used: Echo Park and American Crafts paper, Echo Park and Bella Blvd stickers

Thursday, November 3, 2011

A Card with no sentiment

The sentiment is usually an afterthought for me...seriously.  So I thought this would be easy - but Paige's challenge on the Create Blog this week was somehow tough!  Here's what I came up with...using some of my favorite colors!

I'm so crazy into layering that I feel like this needed more.  But I was out of time and forced myself to just stop!  Plus let's be honest there are still 8 layers if you start at the bottom...how crazy is that!?!
Supplies Used:  Momenta Patterned Paper, Bazill cardstock, The Twinery Bakers Twine, Sizzix Die Cut, Creative Charms Bling

Wednesday, November 2, 2011

Momenta Giveaway and Card

I have been looking for months for a good triangle punch and finally found one last week at Archivers!  I have now used it on one card and one layout!  I am up today at Momenta so I created a card using scraps and this punch as my focus.  I love this Chloe's Garden line!
I've got some Momenta stickers to give away today, I'd love it if you'd hop on over to Momenta and become a follower.  Leave me a comment letting me know you did so here and I'll enter you to win!

Tuesday, November 1, 2011

Creative Charms Winner

The winner of the Creative Charms goodies is 
Beth Hillier!
Beth send me an email at practicalscrappers@gmail.com and I'll get it out to you!

Monday, October 31, 2011

I created a box fold card tutorial for Momenta  This card uses a fold like a box top for the front of it, making for a really surprising and unique look.  I learned this technique several years ago at a Local Scrapbook Store and love to use it when I need a card with something special.  


Friday, October 28, 2011

Creative Charms Blog Hop

Welcome to the Creative Charms Blog Hop!  My term with Creative Charms is over so I thought I'd share with you my favorite projects that I created while on the Creative Charms Design Team.  I've got a whole bag of goodies to give away from Creative Charms!  All you have to do to qualify is become a follower here and leave me a comment! 


Here's the order for the entire hop

Christine - http://scrappingwithchristine.blogspot.com/ ***You are here***
Midori - http://www.scrapsforme.blogspot.com/ ***Head here next***

Creative Charms is going to be picking winners from people who leave comments on their blog and on our blogs too!  So you have a double chance to win today if you leave a comment.  Thanks for stopping by!

Wednesday, October 26, 2011

Hello fall!

Another week another challenge at Create.  I love these challenges...they've totally stretched me.  As I was wandering the dollar store aisles last week I stumbled onto these Leaf Doilies.  Of course I snatched some up and voila, card fun!  I love that you don't have to give one thought to acid free on cards...it's so freeing :)
Supplies Used:  Bella Blvd stickers, Echo Park stickers, The Twinery Bakers Twine

Monday, October 24, 2011

So we used bread tags and ties for our admin feature of Frugal Finds over at Practical Scrappers.  I love these monthly features because they stretch me sooooo far out of my comfort zone.  This first one uses regular bread tags.  I tried to make them blend in...not sure I achieved what I was going for - but it did make for an interesting graphic look.

For my second card I used ties from trash can bags.  They were still hooked together so they made a perfect backdrop for the black frame.  I love how they look like a shiny corrugated paper.  I might just use these again :)

Friday, October 21, 2011

Leaf Piles

If you follow me at all you know this layout does not meet my normal bright and cheery color scheme....but I have to say every time I look at it I love it more :)  Put the whole thing together with a bunch of scraps from here and there.  I created my chevron stripe by cutting 2 inch squares in half to make triangles and then laying them out accordingly.  I like that this looks like fall without having all orange, red, and brown.  Love those colors but love some variety even more!
Supplies Used: Creative Charms Gem Leaves, Miss Elizabeth lace tape, Pebbles (woodgrain PP), Pebbles letter stickers, Cosmo Cricket letter stickers, The Twinery Bakers Twine

Sunday, October 16, 2011

437 Questions???

I recently saw something that said that the average 4 year old asks 437 questions per day.  My darling 4 year old might even exceed that!  Most days she asks me at least 10 times "What was your favorite color when...you were a kid, you were 12, you had long hair?"  The questions are often hilarious making them a little less tedious to answer :).  I love to document our everyday life so for this funky layout I decided to make those questions the centerpiece.  I created this for Momenta and it might just be one of my all time favorites!


I used all kinds of goodies from the Emily's Garden line including the circular letters you see in my title.  I attached each of those to a stick pin.  I used paper from it and cut out flower petals.  I didn't do any tracing or anything for them and just went for a very free form style.  I added bakers twine and a stick pin to the middle of each of those.  After I added all my elements I started writing out some of the questions that Lucy likes to ask.  I wanted to do that last so that I could go back and read all of them without having to uncover something.  I also added some doodling throughout the layout.

Supplies Used:
Emily's Garden Paper Kit PK 2045
Puffy Alphabet Stickers ST 2557
Let's Party Puffy Border Stickers
Other:  Pink Paislee & Doodlebug letter stickers, The Twinery Bakers Twine


LinkWithin

Related Posts Plugin for WordPress, Blogger...