Saturday, July 6, 2013

Bella Blvd All American Layout

I shared one the other day that was actually 4th of July themed..this one isn't but it does use those patriotic colors!


Cooper so thoroughly enjoyed the county fair last year I wanted to document his experience on a page all his own.  To create my background I made a center hole and then did long stitches out from there.  I added little scallop doodles to the long stitches in random locations to soften things up a bit.  I used layers of paper and border strips to mat my photos and topped the whole thing off with lots of sequins and stickers.  I love this line and am looking forward to playing with it more!

Supplies Used:
Ribbon: May Arts
Decorative Tape: Bella Blvd
Stickers: Bella Blvd & Jilliean Soup
Patterned Paper: Bella Blvd
Flags: Bella Blvd
Stars: Maya Road

Friday, July 5, 2013

You Make My Heart Go...Watercolor Painting Layout

I've been wanting to play with watercolor paints on a layout for awhile...finally made time to do it and came up with what is one of my favorite recent layouts!


I started with some plain black and white patterned paper from Teresa Collins and added watercolor painted hearts in the colors I wanted.  Once dry I added the rest, trying to mix up my textures but stick within the same color scheme.  This also happens to include two of my favorite pictures of Cooper too!

Supplies Used:
Patterned Paper: Teresa Collins, Pebbles
Stickers: Bella Blvd, Jillibean Soup, American Crafts, Momenta, SRM Stickers, Echo Park
Washi Tape: Queen & Co, Bella Blvd, My Minds Eye
Wood: Lawn Fawn
Die Cut: Studio Calico

Thursday, July 4, 2013

Happy 4th of July! GCD Studios Card

I got the privilege of hosting the GCD Studios blog today!  Here's my Independence Day card!
 I love to create cards in a freestyle collage style and pile on all kinds of goodies in layers and layers!  For this one I started with my base layer adding patterned paper and faux stitching.  Then came some stickers.  Lastly I piled on some dimensional pieces including chipboard stars from Gina's Designs, a brad, and ribbon.


Supplies Used:
Patterned Paper: Special Delivery Dillon #2040
Stickers: Special Delivery Labels #2052, Letter Stickers #2051
Brad: Special Delivery
Chipboard Stars: Gina's Designs

Wednesday, July 3, 2013

My Premiere at Ribbons Unlimited!

Today was my very first post over at Ribbons Unlimited!  If you haven't checked out their blog you can find it by clicking on this link...they have some mega talents there!  I love playing with ribbon and I love trying to incorporate a couple different types of it into my projects.  Today I have a card to share with you that uses two different ribbons!  I pulled out the new American Crafts line "Mayberry" and combined it with a doily from Gina's Designs.  
I love how ribbon can add a pop of color and texture to a background.  To create my yellow ribbon scallops I used the Sew Ribbon Scallop Tool by We R Memory Keepers and created several rows to weave the ribbon through.  It was the perfect size ribbon to fit!


I then decided to use the sheer ribbon to add a pretty bow to the bottom of the card.  It's a totally different texture than the grosgrain but it works!  I flipped the tails of my bow in different directions so that they didn't make the bottom of the card too heavy.


Supplies Used
Ribbon - Strawberry Organdy Ribbon & Yellow Grosgrain Stripes Ribbon - Ribbons Unlimited
Die Cuts & Stickers - American Crafts
Sequins - Pebbles
Doily - Gina's Designs
Pearls - Ranger

Tuesday, July 2, 2013

Blog Hop Winner

Congrats to the winner from the Practical Scrappers blog hop:
Blogger Patricia said...
Great 2 pager! I love all the circles! I'm a follower!
Send me a message at practicalscrappers@gmail.com and I will get your prize out to you!

I Love Lucy

Not sure if I have done a layout yet titled "I Love Lucy" and it was high time!  
This layout features some fun pictures of her last summer that my mom took while we were awaiting Bo's arrival!  I created a banner belowt he pictures uses paper and stickers from Pebbles along with enamel dots from My Minds Eye.  I also added some doilies from Gina's Designs throughout the layout!  I think I have finally gotten a hang of how to make mist splatters and have been enjoying adding those to white space that just needs a little something extra!

Supplies Used:
Patterned Paper: Pebbles
Stickers: Pebbles, American Crafts, Doodlebug Design
Doilies: Gina's Designs
Sequins: Pebbles
Mist: Studio Calico

Monday, July 1, 2013

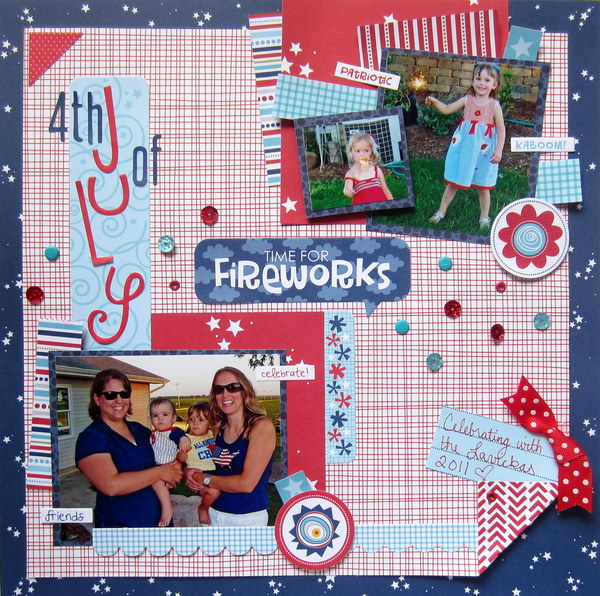
Bella Blvd All American Layout

I fell in love with this line "All American" the minute I saw it!  I love how it combines traditional patriotic colors with some non-traditional ones!  
For this layout I combined some current trendy items like sequins with some old stash items like eyelets and brads.  Always trying to shrink that stash!  The pictures are from a couple years ago....now you could just replace Cooper with Bo and I might look pretty much the same :)  I added lots of layers of papers and stickers underneath my pictures as well as a different vertical title. Had fun playing with the lettering on that one to make it more unique!

Supplies Used:
Ribbon: May Arts
Letter Stickers: Jillibean Soup & Bella Blvd
All other Supplies are Bella Blvd

Friday, June 28, 2013

Practical Scrappers Project Life Blog Hop

Hello and welcome to the PRACTICAL SCRAPPERS and SCRAPTOWN LADY Blog Hop! We thought it would be fun to combine forces and share projects with you that have our design teams’ takes on one of the hottest scrapbooking trends around: Project Life.


Whether you are a “Project Lifer,” are interested in Project Life, or just want to find out ways to use all those fantastic Project Life types of products and ideas on your own projects, we have a hop FULL of inspiration and creativity! We’ve got a fabulous prize, too - a $25 gift certificate to Scraptown Lady’s shop, which is stocked with awesome scrapbooking supplies! 

What do you have to do to be entered in the drawing? It’s easy!

1. Be a follower of Practical Scrappers; and
2. Be a follower of Scraptown Lady; and
3. Visit all the blogs, starting with Practical Scrappers and ending with Scraptown Lady, and leave a comment at each blog along the way.

We will be hopping until Sunday, June 30th, at 11:59 p.m. CST. The grand prize winner will be announced on Tuesday, July 2nd!


If you get lost along the way, just check the complete list below to get you hopping in the right direction:
Christine Freet Meyer ****You Are Here ****

If we have inspired you so much that you “need” to do a little shopping now, SCRAPTOWN LADY is offering 20% off all orders during the hop! The sale runs from now ‘til midnight Monday. Enter “code20” to receive your discount.

And as thank you for stopping by my blog, I am doing a giveaway!  Become a follower and leave me a comment and I will enter you in to win a prize pack of goodies from GCD Studios!


I am a big fan of documenting day to day life for my family.  I haven't taken on the Project Life in it's full version but I have taken to buying the cards, downloading cuts for it on my Cameo, and taking day to day pictures.  As you can see today I am sharing a layout that uses all of those!  It's a fun layout that certainly tells a story but many of these pictures couldn't stand on their own on a layout...they tell a more complete story together of life with this precious girl!  I'd love to hear if you've taken on Project Life or if you have your own apporach to it - leave me a comment and let me know!  And then hop on to Erin's blog!

Supplies Used:
Patterned Paper: Pebbles
Washi Tape: Bella Blvd
Enamel Dots: My Minds Eye
Stickers: Pebbles, American Crafts, Little Yellow Bicycle
Twine: The Twinery


Thursday, June 27, 2013

Reverse Canvas Heart starring Mayberry by American Crafts

I love the new Mayberry line from American Crafts and I had the chance to work with it for The Scrapbooking Studio.  Today I am going to share with you a reverse canvas that I made.
 Remember a few months ago when I made heart canvas that was inspired by the American Crafts blog...if you missed it you can see it here.  That got my wheels going on creating a canvas with the folded circles I like so much.  

 To create it, I cut out a big heart.  I started adding the folded circles and once done trimmed up the ones that ran over the edges.  It surprisingly didn't take too long...maybe an hour!  I started off with it being on traditional canvas....but I wasn't happy with some of the elements (shhhhh if you go into The Scrapbooking Studio do not look at the back side).  So I flipped it over and went with the reverse side.  This provides sort of a shadow box element!  I covered the frame part with some wood grain washi tape.  From a distance it really looks like a wood frame!  It was a little tricky to get that all adhered but in the end I am quite pleased with the results!

The colors of this line are a super unique combination but go together really beautifully and they scream summer!  I am planning to pick up more pieces from the line to play with because I am not ready to say goodbye to it just yet!

Supplies Used:
Patterned Paper: American Crafts
Wood Hearts: Studio Calico
Die Cut: Silhouette Cameo
Washi Tape: Glitz Design

Tuesday, June 25, 2013

Pebbles Freestyle Collage Card

I was in need of a distraction from real life the other night and decided to pull out some of my favorite products and make some cards.  This card combines a variety of products from Pebbles.


I recently worked hard at defining my card style/s.  Seems perhaps like a silly task...but it has helped me in knowing what direction I want to go on each project.  I determined that one of my most dominant styles is Freestyle Collage.  That is exactly what this is!  I love combining several elements, textures, and colors and having them come together to make a beautiful ensemble!  Some take this to a level with many, many layers....but my style is more to keep it relatively simple :)  And with all these beautiful colors from Pebbles, how can you not Smile (go ahead and smirk at me :))

Supplies Used: 
Patterned Paper: Pebbles
Stickers: Pebbles
Ribbon: Ribbons Unlimited
Enamel Dots: My Minds Eye
Ledger: Maya Road


Sunday, June 23, 2013

GCD Studios Card

Today I have another card to share with you created for GCD Studios!  

I love geometric shapes and negative space so when I saw this cut for my Cameo I knew I had to have it!
I added some black faux stitching to bring out the black in the sentiment.  And there's some more of those long stitches.  If you are thinking this card took some patience to put together, you'd be right!  But I think the end result is worth it!

Supplies Used:
Patterned Paper: GCD Studios Special Delivery Line
Enamel Dots: GCD Studios & My Minds Eye
Stickers: GCD Studios

Friday, June 21, 2013

Pebbles Pool Party by Amy Locurto Projects

Today I have two more projects to share with you featuring the Pool Party line from Pebbles.  Both are samples hanging up at The Scrapbooking Studio.  First off a quick, clean and simple card!  
Yes, I am way into hand stitching....
For this one cut out the center portion of the card and then used the polka dots as my guide for where to making my stitching holes.  The long yellow stitches add just enough texture and color without making the whole card overwhelming!  I then added a cluster of stickers and 3D stickers to the bottom and top corners.

My second project is a small canvas that I made.  I started out wanting to make it a little canvas that stood on decorated binder clips.  But the binder clips, well, they looked dumb and actually took away from the project itself!  So it's a stand alone canvas :)  I covered the canvas with paper and distressed the edges a bit and then once again got busy embellishing with stickers and 3D stickers.  Pebbles makes it so easy with all their coordinated goodies!

Supplies Used:
All supplies used are from Pebbles

Tuesday, June 18, 2013

I (heart) nerds - GCD Studios card

This month I had two cards in the digital magazine Paper Cuts.  Here is one of those creations!
The topic was "nerds" so fussy cut glasses and googly eyes it was!

Here's a link for you to the entire magazine!  It's free and full of all kinds of fabulous ideas!

Supplies Used:
All supplies used are from GCD Studios


Sunday, June 16, 2013

All About a Boy by Echo Park Layout

As I was sorting thru pictures I realized I had a very similar shot of Timmy with a baby Cooper and a baby Boaz!  So of course that called for a side by side layout of the two of them!  It was a quick, clean and simple layout!


Over the years my scrapping layouts have changed quite a bit.  I now tend to work primarily in one line from one company with a few possible embellishments added in here and there.  There are a couple reasons I do that:  
1) Companies put out great coordinating stickers, papers, phrase packs, etc....you don't have to spend time (which is precious for all of us) searching for just the right match.  Let's face it, with four kids...time is a commodity!
2) Often you can buy these collections in a pack, making it way more cost effective.  
3) I like to be able to share them on company facebook walls :)

This layout is the perfect example of sticking with one company...all that doesn't belong to Echo Park is the bakers twine, mist, and enamel dots!  That made the whole thing come together in a snap!

Supplies Used:
Patterned Paper & Stickers: Echo Park
Twine: The Twinery
Enamel Dots: My Minds Eye
Mist: Studio Calico

Clean and Simple "Hi" Card

Popping in today and sharing a card that features some of the softer colors of Special Delivery from GCD Studios.  This line rocks the bold primary colors that scream boy, but it also touches on a softer feminine side too with the greens, light blues, and yellows.


I never would have predicted this card would have come out of this line had I not created it with my own two hands.  I love a line that is so versatile!

The flowers that I used are fussy cut from some of the patterned paper and add just the right delicate touch.

Supplies Used: 
Special Delivery 6 X 6 Paper Pad #2050
Chipboard Alphas #2090
Adhesive Pearls #1887
Die Cut Borders #2055
All from GCD Studios

Saturday, June 15, 2013

Dad Cards

Today I am going to share a couple of "Dad" cards that I used the same cut from my cameo on - just one uses the negative space and one uses the positive space.
 For this one I used the negative space of the cut, including flipping over the inside pieces and using the reverse side of the patterned paper.  I also filled in random squares on the grid to add some interest.

Supplies Used:
Patterned Paper: Simple Stories, Echo Park
Stickers: Studio Calico (arrows), Heidi Swapp (ultimate

For this one I used the actual letters from the cut.  I outlined them with small metallic gold liquid pearls...this took forever but had a really neat effect.  I went dot by dot trying to carefully lift in between each dot.  Loving the bang for your buck you can get with liquid pearls!

Supplies Used:
Patterned Paper: Simple Stories, My Minds Eye
Liquid Pearls
Stickers: Jillibean Soup

Thursday, June 13, 2013

Pebbles Pool Party by Amy Locurto layouts

Today I have a couple layouts to share with you featuring Pebbles Pool Party by Amy Locurto.  This was a fun, bright, summery line!  I created these as part of my design team work for The Scrapbooking Studio!  I am trying hard to not do so many layouts that are just one picture...I think there's an art to being able to get two or more pics on a page and am enjoying exploring that!

 I love that they offer these coordinating medallion flowers...frankly I think those are hard to make and will gladly purchase pre-made ones!  This line also came with some great stickers which you can see I used throughout both layouts!

I felt like the bold lines on this background paper were overpowering the layout, so I added some doodling in white to soften thins up a bit.  I was surprised how much that helped!  

Supplies Used:
Patterned Paper: Pebbles
Stickers: Pebbles & American Crafts
Washi Tape: My Minds Eye and Bella Blvd
Garland: Pebbles

Saturday, June 8, 2013

8 Months - Already?

Each month I enjoy getting out the "month" sticker for Bo's picture just because I like to see what color combination they came up with!  This month was gray, red, and black....a different one for scrapping a layout!
I used a lot of Little Yellow Bicycle on this one...the "Just Because" line has great gray and red combos in it. All I added to that were some black and gray washi tapes, some enamel dots, and some AC Thickers and it came together quick and cute.  I really love these Thickers and bonus - they come in a variety of colors!  I think now I have gotten his 8 month layout done and his 2 month layout....time to start filling in the rest huh!

Supplies Used:
Patterned Paper: Little Yellow Bicycle
Stickers: Little Yellow Bicycle, American Crafts
Washi Tape: My Minds Eye, Queen & Co
Enamel Dots: Bo Bunny

Wednesday, June 5, 2013

A substitute for enamel dots....

I created this layout last night in my "make a layout each night" spree!  One of my goals in the creation of these is not to spend hours and hours....but to just play and see where it takes me!  These are pictures of my sweet little nephew who is 19 months now!


I've been enjoying creating layouts so frequently because it is forcing me to get out some of my new goodies and play with them right away!  Lately I tend to do my projects primarily in one collection from one company and just add a little here and there from other companies.  But this layout is a big ol' hodge podge of different companies! One of my favorite products out right now is the enamel dots.  But they are so popular that my LSS is sold out of them!  So I decided to try liquid pearls and see how they work as a substitute.  That is what all the gold dots are on this.  They worked perfect...only real difference is they have to dry.  I love that I can vary my sizes with the perfect pearls!  I will be getting more colors to use in my stash on my next trip to The Scrapbooking Studio!

Supplies Used:
Stickers: American Crafts, Bella Blvd, Studio Calico
Patterned Paper: Echo Park
Decorative Tape: Bella Blvd, Queen & Co, We R Memory Keepers,
Ledger: Maya Road
Wood Veneer: Studio Calico
Enamel Dots: My Minds Eye
Flair: The Paper Bakery

Saturday, June 1, 2013

Gina's Designs Freebie Friday Printable: Card

Just realized I didn't share my card from Gina's Designs that posted yesterday!  This is hybrid card #2!


I dry embossed my brown cardstock with a wood grain folder.  The sentiment comes from Jilllibean Soup in the form of a die cut journaling card.  I liked how it matched up with the butterfly!  I added a little bit of misting splatters...this seems to be one of my current go to techniques...I am using it on nearly every project! The Gina's Designs cardstock doily is backed by another Jillibean Soup die cut.  And the lovely butterfly if from Gina's Free printable....which you can find here!  So much easier than stamping!

LinkWithin

Related Posts Plugin for WordPress, Blogger...