Showing posts with label card. Show all posts

Friday, June 8, 2018

Father's Day Card

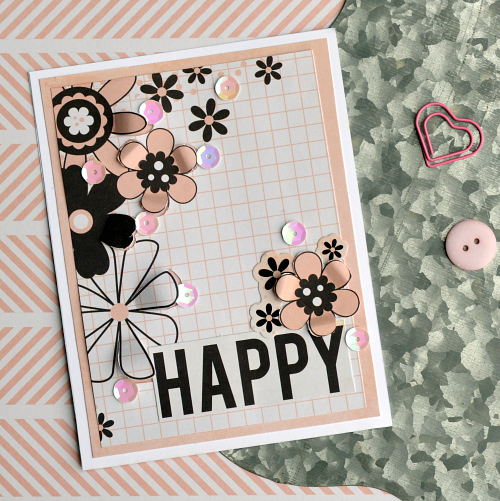
With days like Father's Day that we celebrate year after year, it's always nice to have some fresh inspiration.  So I thought I would shake things up in my routine and create a card with some gold foil and dimension for this Father's Day!  Here's what I created for Scrapbook Adhesives by 3L:
**I receive products from Scrapbook Adhesives by 3L and Paper House Productions for use in my projects. The opinions are completely my own based on my experience and doing so I can share what I personally love to use.**
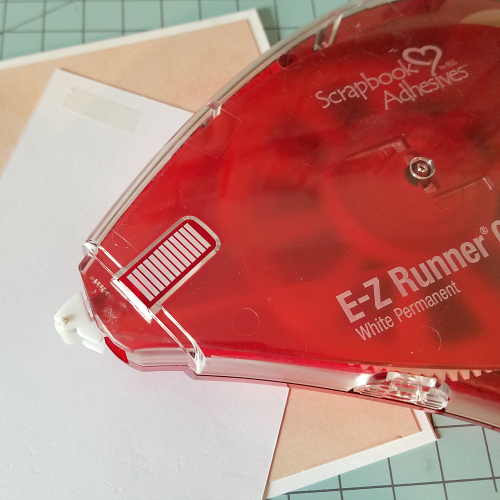
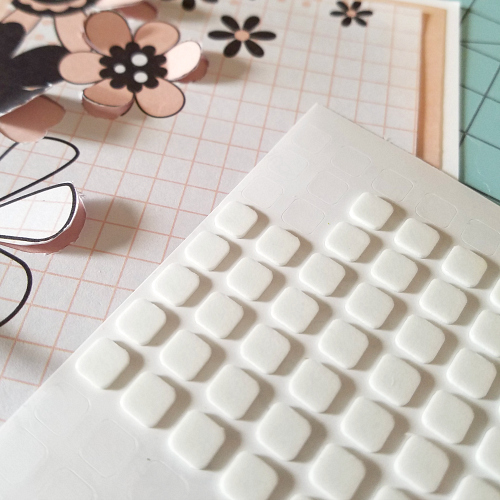
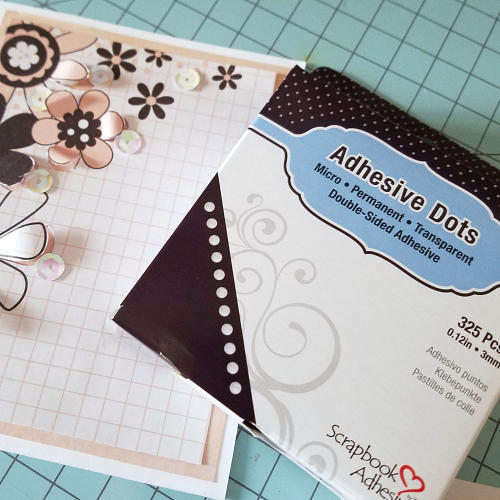
This is a pretty simple card to assemble - you just need to follow a few steps!  You can check out all the steps over on the Scrapbook Adhesives by 3L Blog.


Monday, June 12, 2017

Happy Card using Scrapbook Adhesives by 3L

I'm loving the Be Happy Paper Pad from Paper House Productions, so when I needed to make a wedding card and create something for the Scrapbook Adhesives by 3L Blog, I went back to that pad!
**I receive products from Scrapbook Adhesives by 3L®,Paper House Productions and SRM Stickers for use in my projects. The opinions are completely my own based on my experience and doing so I can share what I personally love to use.**
Happy Card for a wedding or other happy occasion feauring adhesives from Scrapbook Adhesives by 3L
In order to add a variety of techniques and elements to this I needed to utilize multiple adhesives.
The E-Z Runner® Grand Dispenser has quickly become an absolute favorite for me.  It’s perfect for all your normal adhering, loads easily, and is sturdy.  I used it to add my first two layers of patterned papers to the card base.
Happy Card for a wedding or other happy occasion feauring adhesives from Scrapbook Adhesives by 3L
Next I used Thin 3D Foam Squares to pop up the petals on my card.  I used a craft knife to cut those up and the squares ensure they will stay up even after getting smashed in an envelope.
Sequins can be a headache to attach.  But Adhesive Dots Micro ensure the headache won’t hit!  I used these to attach all my sequins and I also like to use them with other small embellishments like wood veneer and buttons.
Here's the supply list for this card along with Affiliate Thumbnails:


Saturday, January 7, 2017

Wrapping up my term with Doodlebug Design

With the new year always comes a change in design teams and this year I have wrapped up my time with both Doodlebug Design and My Creative Scrapbook Kit Club.  I enjoyed my time with them but am always ready for the next adventure in designing!  I thought I'd take some time and share some of my favorites that I created with them over the last year!  Today I am going to share my faves from Doodlebug and tomorrow I'll be back with My Creative Scrapbook.  If you are interested in checking out the collections up close just click on the name link and it will take you to Scrapbook.com to see more!

 Anchors Aweigh was a great spring collection with a little boy emphasis - it had great colors and so many fun embellishments - I used it for bath time but it also works great for all things water and adventure related!

I made a set of cards using Boos & Brews but this mad scientist one was definitely my favorite!

 We were challenged to use the new Chunky Twine to create a project and I decided to a wrapped monogram.

Flea Market was such a fun and inspiring collection - I went with creating a one of a kind wreath with it!  I have a video to go along with this one as well!


I had SO much fun creating cards with Kitten Smitten - I'm not even a cat person but I still loved it!


Mixing and matching was the name of the game on this one and I combined Under the Sea and Anchors Aweigh

 Another mixing and matching but focused on Petite Prints!  Love how the rainbows always come together for Doodlebug!  

Gah! I love the colors in Polar Pals!  So unique and rich! 

Probably my favorite layout of the whole year and favorite collection of the whole year too - Puppy Love!

Love those rainbows!  And this one focuses again on the Petite Prints but also has lots and lots of Doodlebug's Sprinkles!

 Under the Sea was the sister collection to Anchors Aweigh and it was a dream to play with using little girl pictures!  

In my ongoing quest to find a clever twist on a product - I went crazy with the Here Comes Santa Claus Collection and used this to create a December Recap page!  This one also has a video tutorial!


Thanks for joining me for this fun little walk thru a year of Doodlebug Fun! As much love as I have for Doodlebug you know I will continue creating with their products regularly!  If any of these collections catch your eye be sure to head to Scrapbook.com and check them out - since most of them are getting to be older you can find discount prices on a lot of them!  You can find all the Doodlebug supplies they supply by clicking here!

Tuesday, November 8, 2016

Quick Tip Tuesday Process Video - Creating Cards

Process Videos can be long and although they are interesting to watch I decided I wanted to add something to the mix that was a little quicker.  Beginning today I am going to start sharing a weekly video with "Quick Tips" every Tuesday.  Each week I will have a video that is under three minutes showcasing a quick idea for using up your stash or a quick technique.  Today's kicks off with a card using the Creative Kit from My Creative Scrapbook!  


And here's the video for it!

To recap here's a couple of the points for making a quick card:
-Stick with die cuts and stickers that coordinate
-Use one large base sticker and build on top of that
-Use little stickers as accents
-Save time using just a few supplies not everything you can possibly coordinate
-Get the most out of a kit or collection by putting together some cards after you've created your other projects.

Hope I have inspired you to pull out some stash and put together some quick cards!

Monday, May 16, 2016

Graduation Card

Graduations are right around the corner and SRM Stickers has stickers that are perfect for customizing your cards to fit the colors of your school!  It's been awhile since I have made cards - I had fun with this graduation card using Graduation Stickers by the Dozen and the Year of Memories/2016 stickers. With these two sets you can easily make a whole bunch of graduation cards to take along to each party!

The stickers are clear and black so they work perfectly for personalizing with things like or sequins, cardstock, or even some Sticker Stitches!

I added the biggest 2016 I could in the center and at an angle to up the whimsy!

The Stickers by the Dozen make it easy to add lots of caps to the card.  I used a circle punch to punch it out so I didn't have to try to place my sticker to precisely.

We're looking forward to seeing what cards and treats you are making for the grads in your life!

Thursday, February 4, 2016

You're Just My Type - Valentine Card

Tomorrow I'll start sharing a whole bunch of My Creative Scrapbook Kit layouts but before that I wanted to share one more Valentine card that I made using the Doodlebug Sweet Things collection.
Have I mentioned how much fun I am having with Doodlebug ;)?

I made this at the same time as I made the "lift the flap" Valentines that I shared last week.  I used my craft knife again to trim out the paper and roll it forward.  But since it didn't fit with the other three cards I decided to hold it back and use it here.  Using a craft knife can be challenging and I got a bit of a jagged edge but nothing a pretty twine bow can't cover up!  I also added some of the shaped sprinkle hearts.  I love the sprinkles both in shapes and dots from Doodlebug and am finding I use them on tons of projects!

Later today I'll be back with a little bit of exciting news about my Scrapbooking Career...

Thursday, December 3, 2015

Faith Layout & Card

Paper House isn’t new to making Faith based papers and stickers and I have always loved using them. They are great for home decor, cards, layouts, you name it!  Today I am going to share a layout and card with you that I made with their newest Faith Collection that includes  patterned papers, cardstock stickers, and sculpted puffy stickers too! First up is a layout I created with it.

I didn’t scrapbook about a specific event for this layout but focused on what I want for my children.  I picked a couple of pictures of them as a group from a time that they had been having fun together.  I used the Faith Sculpted Stickers that said Faith, Hope, and Love to help communicate that. I also used some stickers from the Live by Faith Cardstock set. The background paper is beautiful but I wanted to add some texture to it.  I decided to add some long lines of hand stitching to accomplish that.  

This collection also makes beautiful cards!  My starting point was with the lighthouse pocket page piece. The collection includes a 12 X 12 sheet of 3 X 4 pieces that are perfect for either pocket pages or cards.  I built the card up from there including several cardstock stickers and some additional patterned paper to break things up.  I topped the whole thing off with some enamel dots and bakers twine.

Keep your eye out for this collection in your local big box stores - I’ve seen it in mine!  You will love playing with it when you get your chance!

Wednesday, August 5, 2015

Paper House Productions "Gatsby" ColorWays gift set

I shared a layout using the new ColorWays Gatsby line with you last week.  Today I have two more new projects using it that work together great as a gift set.
I cut out this gift bag on my Silhouette Cameo and then covered it up with patterned paper.  I added a different paper to the flap to add some extra dimension to it.  I also used a rub-on for the sentiment (You Dazzle Me) and some accent pieces to decorate the bag.

This card was simple to make thanks to the Accents pack from the Gatsby line.  The base is patterned paper but the layers are all from the accent pack - including the background, the "shine bright" sentiment and the diamonds and triangles.  

I can't wait to see the amazing creations coming up from both the Paper House Productions Design Team and all of you using this new line.  It is truly spectacular!


Thursday, July 9, 2015

Vintage Thank You Card

 SRM has recently released some new fabric bags.  They don't have to just be used as bags and I decided to challenge myself and see if I could find a way to use them on a card!    I love the romantic feel of the Linen Bags with Lace so I decided to create a card incorporating that one. 

I used the 3 X 5 Linen Bag with lace along with a 4 inch White Doily to create the base for my card.  It had a bouquet feel to it so I went with that and started adding flowers, leaves, and pins to play up that idea.  Although it looks like the flowers are tucked into the bag they are actually just placed at the top!

If you wanted to add a little gift inside the bag (jewelery would fit great) you could and the bag could easily be pulled off and opened! I didn't put anything inside of mine but did choose to top it with a sentiment.  I felt like the mood of the card called for a Fancy Sentiment so I used one from the Fancy Sentiment/Thanks set.

What kinds of different stuff would you create with a bag like this?

Supplies Used: 
Flowers: Prima
Sticker: SRM Stickers
Bag: SRM Stickers
Doily: SRM Stickers
Vellum & Cardstock: Core'dinations

Tuesday, June 9, 2015

Sunshine Shaker Card - JustNick Design Team

I'm so excited to be joining the team at JustNick and working with her trendy and fun cutfiles!  Today is my introduction over on her blog!  Here's the first project I made - hop here for all the details!


Supplies Used:
Patterned Paper: Echo Park & Bella Blvd
Cardstock: Core'dinations
Buttons: Doodlebug Design

Sunday, May 31, 2015

Published Card from Create Magazine

Last week I shared with you a layout that I had published in Create Magazine as part of the Paper House Productions Design Team and today I have a card to share!

This card was based on a sketch provided by the magazine.  I used ColorWays Noir including the accent pack and rub-ons to create it.  I fussy cut the feathers out of some patterned paper and then lined them up.  Since they were all a little different in size I tried to be fairly random about it (other than the color pattern).  I cut out applied the "Awesome" letters to a grid patterned paper.  Then topped the whole thing off with more rub-ons, die cuts, and doodling :)

Supplies Used:
Rubons: PaperHouse Productions
Patterned Paper: Paper House Productions
Die Cuts: Paper House Productions
Cardstock: Core'dinations

Friday, May 8, 2015

Sunny Smiles Card

Sometimes as I am playing around inspiration strikes.  As I was playing around with my Punched Pieces from SRM Stickers and dreaming of warm weather I had the idea to use them to make a Sunshine! Have you noticed I am really into hand stitching right now?  And sunshines?  I definitely am :)
To start I did a whole bunch of mist splatters in bright colors. I've been noticing the splatters technique really retrending, not sure it ever went away completely, but it's definitely gaining strength again! Then I layered the three sizes of Punched Pieces: Large, Medium, and Small putting some foam adhesive between them.  I then added a sticker from the Sentiment/Summer set right to the center of the sun.


Adding stitching for my rays brought in some fun texture and didn't take long at all!  I then topped the whole card off with some wood clouds and enamel dots/hearts.  

Hope your spring is off to a Sunny start full of Smiles!

Friday, May 1, 2015

Boxed Card Set

SRM has containers for all your needs! Today I am going to share with you how I used the A2  Card Box to make a personalized card gift set.

gift card box
I started by decorating my box.  First I used a speech bubble metal die to outline a speech bubble with the Easy Chalkboard Marker and filled the whole area in with the marker. I smudged it up with my Bistro Chalk Marker in White to give it that chalkboard feel.  Layered white Punched Pieces in Medium and Large cover up the sentiment on my cards so they don't distract from the outside of the box.  I added a Sentiment/Congratulations sticker to the speech bubble.  A stamped butterfly from the Spring Stamps was fussy cut and added for some whimsy.

boxed card set
Inside I had five cards that all followed the same format:
I added a line of sticker stitches, a sentiment, and three stamped butterflies.  It was very clean and simple but meets the needs of a variety of topics. I used Core'dinations cards for the base and they come with those awesome borders!

boxed card set
I used the following Sentiment Stickers:
I liked the variety so that the person has cards for several occasions that will work!  The sticker stitches were all from the Black Sticker Stitches.  I love that set, it is a staple in my scrapping stash!
In addition to the Spring Stamp Set I also used a butterfly from the Life is Good stamp set to add a little variety.

I can't wait to share this little set with a friend!


Wednesday, April 29, 2015

Core'dinations Mother's Day Card

I am up on the Core'dinations blog today!  With Mother's Day fast approaching I am on the lookout for ways to make the day even more special.  A handmade touch is one sure way to make mom smile and today I am going to share with you a card that you can make for her using a few simple tools and cardstock!
Mother's Day Card
Supplies Used:
Step 1: Use the embossing folder to emboss the blue cardstock. Sand it to bring out the Kraft color and dust it off with your dust buddy.Cut it down to be a 4 X 4 inch square and attach it to a 4 1/4 X 5 1/2 card base.
Technique Tip: Embossing weakens cardstock so as you are sanding be gentle and try be deliberate in what direction you are going.  I like to sand all one direction and then turn the card and sand another direction until you have brought out as much of the core as you want to show.
Mother's Day Card 2

Step 2: Punch out triangles and fold the short side of the triangles over like pictured.
Mother's Day Card 4

Step 3: Fold the triangles in half so that they will have dimension.
Mother's Day Card 3

Step 4: Using a strong adhesive like hot glue attach the "petals" to the circle (the circle won't show so any scrap paper is great - it just gives you a base to build before adhering it to your card).
Mother's Day Card 5

Step 5: Once all the petals are glued down attach it to your card and add a button to the center.
Step 6: Add leaves underneath the flower petals and attach the Mom sentiment.  I cut my sentiment on my Silhouette Cameo but letter stickers would also work great!
Mother's Day Card

Monday, February 23, 2015

Leprechaun Hat Shaped Card Tutorial

I don't know if it's the colors involved or the whimsical nature of the holiday but I love making St. Patrick's Day paper crafts.  It may be my favorite of all the holidays!  Today I am sharing a shaped card hat looks like a Leprechaun hat over at the Core'dinations blog along with the tutorial on how to make it! 

Lucky-CardLeprechaun Hat Card Supplies:
Now on to the fun part of how to make this card!

Step 1: Cut out a Leprechaun Hat shape and one in it's mirror image.  I used my Silhouette Cameo for the cut and you can find the file here.  The file will give you most of the pieces you need to cut out the hat and the accessories. For the piece that will be your back score a line about 1/4 inch from the top of it.

Lucky Closeup 4

Step 2: Add adhesive to the scored part and stick your two pieces together.  The scored part will now allow the back of the card to fold back.

Lucky Closeup 3

Step 3: Cut out a stripe from the black Tillie Dot cardstock to be the sash on the hat.  Sand it to bring out the core.

Lucky Closeup 5

Step 4: Cut out a Shamrock out of the Tillie Dot cardstock also but don't sand it this time.  Add the sash to the card. Cut out a belt buckle from the Gold Adhesive Cardstock. Add that and the Shamrock to the sash.

Lucky Closeup 2

Step 5: Cut out a sentiment from the Gold Adhesive Cardstock and attach it to the card. I also used a Silhouette cut file for this and you can find it here. Outline the whole card with faux stitching or dots.

Lucky-Closeup-1


LinkWithin

Related Posts Plugin for WordPress, Blogger...