Monday, November 30, 2015

My Creative Scrapbook Creative Kit Projects

It's still November and I'm not wrapping up fall projects until I share these with you today!  I loved the Creative Kit from My Creative Scrapbook this month and here's the different projects I made with it!
I made another fall wreath this month but this one was a different style from last month! 

A Thanksgiving pocket page...I've got all my pictures ready to do one now for 2015!

This one was based on the sketch from My Creative Sketches this month.  You have a couple weeks to play along - it's a great sketch so be sure to check it out!

The kit was also great for Halloween layouts especially if you don't want to go heavy on Halloween product.  This one was all about my little princess!

And another Halloween layout about my little monkey - I added in some hand stitching to give some added whimsy.

Tomorrow we start with sneaks of the December Kits and I assure you, you don't want to miss them!  The team knocked this one out of the park!

Monday, November 23, 2015

Decorated Burlap Stocking

The new Burlap Stockings from SRM Stickers are perfect for the upcoming holiday season and right on trend with all the burlap out there!  Today I am going to show how I decorated mine using some of the new patterned vinyl.If you are thinking, wait what!?! Patterned vinyl on burlap? Well I will explain later on why this can be a really good option!
I love the look of the Burlap Stocking with Red Trim and was excited to get my hands on it.  I used my electronic die cutting maching to cut out some of the Patterned Vinyl in Red Dots to make the word Joy. I added that to the stocking.  It sticks really well but is not permanent.  I actually kind of like that because it's on there well enough that it isn't going to fall off, but if I want to pull it off and change it up next year to match new decor, I can!

I also used some 2 inch Lace to decorate the top portion of the stocking.  I attached that using liquid fabric glue.  Can you go wrong with combining burlap and lace? I don't think so!  I also added some ribbon and little ornaments to the stocking hook.  I did this mostly to bring in some additional color and interest.

This was a fun step out of my normal paper crafting box - hope you enjoy it as much as I enjoyed making it!


Saturday, November 21, 2015

Paper House Productions Holiday Blog Hop

Paper House Hoilday Blog Hop

This weekend, the Paper House Productions Design Team is hosting a Holiday Blog Hop! We have tons of Holiday inspiration for you from the team members.

We can't wait to share all their projects with you. To celebrate the hop, we're giving away a $25 PaperHouseProductions.com Gift Card! That's $25 to spend on ANYTHING on the Paper House website!
Paper House Gift Certificate
Paper House Holiday Blog Hop
Holiday Blog Hop Designers
Christine Meyer ***You Are Here***
Karyn Schultz ***Head Here Next***
Paper House Productions***Go Here to enter the contest***
Make sure to hop through each designer on the list and leave a comment on their blog post to be eligible! When you're done, just hop back here and let us know! The hop will be running all weekend, so you have until Sunday at 11:59pm EST to get your entries in! Happy Hopping, and Happy Holidays!
And now for what I have created.  I did something a little different - I made three cards all for Christmas and all based on the same sketch from Create Magazine this month!
This first one is a Shaker Card because who doesn't love getting those!?!  It uses patterned paper from the Colorways Rouge collection and some Die Cut Stickers too!

This one also uses the Colorways Rouge collection but is a very clean and simple approach.  Half a doily and some beautiful stickers is all it took to make this fun little one!  I like how different it turned out!

On this one you can see the return of the Winter Wonderland Die Cut as well as more Colorways Rouge paper.  And of course some of my favorite 3D stickers from Paper House which are so perfect for adding dimension!  

I know you have lots of hopping to do so I won't keep you any longer!  I'd love to hear which card is your favorite before you hop on over to my talented friend Karyn's blog!  Have a wonderful and relaxing weekend!

Tuesday, November 17, 2015

American Girl Doll Layout

The die cut stickers from Paper House have been a favorite of mine since they were released!  As I was creating for the upcoming holiday season, I kept going back to the Winter Wonderland Pack and today I am going to show you how I created a layout with them that showcases my daughter getting her American Girl Doll! I was so excited to finally scrap these pictures!

This layout was based on a sketch from Create Magazine which featured the Paper House team earlier in the year!  The snowflakes from the die cut pack provide the perfect background!

The snowflake die cuts are textured with glitter and add just the right amount of sparkle to a layout.  There are multiple options for snowflake design and you could even cut them down to make smaller ones and add more options!


I love this background paper with the trees and plaid!  It’s called Deck the Halls and has an awesome second side too!


My favorite thing about this layout is the way that so many different items from Paper House come together beautifully to make a creation - I didn’t have to work from just one collection but could combine several items!  The ones I haven’t already mentioned can be found in the supply list below - I know you will want to check them out for your own Christmas Creations!

Supply List:

Monday, November 16, 2015

Mini Calendars with SRM Stickers

Mini Calendars are the perfect item to make for little gifts for the upcoming holiday season! Today I have a Mini Calendar that hangs in a frame that is perfect to set on a desk.


Using several things can make this project a quick and easy one!  I used some ready made tags as the base for each month.   The tags came in a variety of colors and since I love color I went with that!  But you could just as easily do it with all white tags or black or kraft and make it less bright!The Wafer Thin Die for the Decorative Calendar made cutting out the Decorative Calendars fast!
I cut out a simple patterned paper and put that on each tag.  I then used the metal die cut to cut out the calendar stickers and mounted those to the white cardstock.  I added those to the center.  Once they were done I added them to a jump ring.


I took the glass part out of this standing frame and then put my jump ring at the top so the tags were hanging down and can be flipped over for each new month.


To add some variety I used different sticker stitches throughout - some got white!


Some got black sticker stitches!  SRM has stitches that are available in both stickers and stamps lots of options there!  I'm partial to the stickers so I went that route but it wouldn't be any more difficult to do the stamps!

We can't wait to see what you've been creating with the 2016 Mini Calendars!

Saturday, November 14, 2015

Turkey Anyone?

Have you seen these cute rosette turkeys?  I have seen a few people do them and decided to try my hand at them with the Main Kit from My Creative Scrapbook this month!


Here's the details on how you too can make one!
Cut out three patterned paper strips.  One should be 1.5" X 12", one should be 1.25" X 12", and the last should be 1" X 12".  

Score lines on it each strip every 1/4 or 1/2 inch.  I did 1/2 inch to make the rosette a little less full.  Fold and secure it into a rosette - adding a punched circle to the front and back that coordinates.

At first I was trying to figure out how I was going to make the turkey body but then I looked at the sticker sheet and things got a lot easier :). Use the turkey sticker to trace a turkey head and body.  Cut it out and fold a small piece over so you can attach it to the body.

Layer the rosettes and turkey head together with a strong adhesive like hot glue.  Allow to dry.  It will stand up pretty well on its own but if you want it to be more stable you can hot glue it to a circle on the bottom.


Tuesday, November 10, 2015

I'm Thankful for You - My Creative Scrapbook Layout

I've been vacationing with my family so I took a little blogging break but I am back today to share more from my creations from My Creative Scrapbook this month!  This layout is about my middle son and uses the Main Kit from this month.
I took him outside to capture some recent photos and they turned out just great!  I wanted to play up all the beautiful patterns and textures available in this kit so as you can see I worked in a variety of elements from ribbon to patterned paper to chipboard frames.  I set my pictures up to be the focal point up top and then created various clusters of elements above and below it.  He loves foxes so I had to include a fox!  I also added my journaling to the back so that I could keep my gratitude list to myself.  

I'll be back to share some Creative Kit projects with you later this week!
Thursday, November 5, 2015

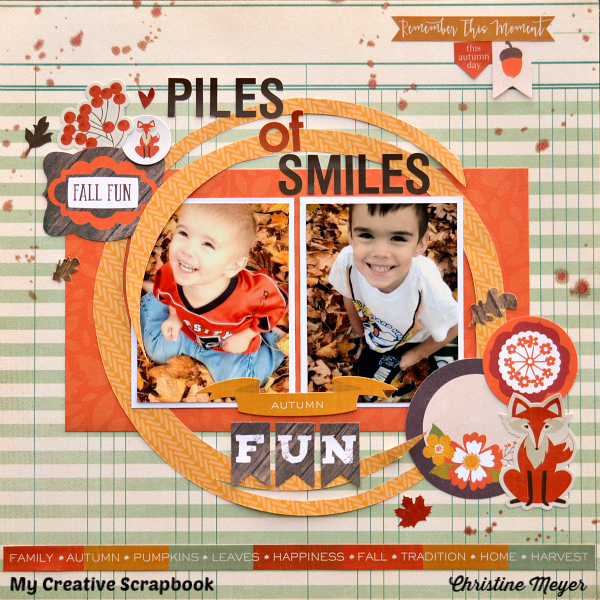
Celebrate Fall Fun - My Creative Scrapbook Kit Club Layout

It's the 5th and that means it is time to start the full blown premiere of my kit projects for My Creative Scrapbook this month!  I had so much fun playing with the fall themed kits!  I thought I'd start by sharing my favorite of all the layouts I created!  This one comes from the Main Kit which is packed with all kinds of goodies from Carta Bella, Simple Stories, Echo Park, and Photo Paper Play.
I shot these pictures of my son just to do a fall layout and I love how the brown shirt matched his brown eyes and the brown paper.  I used the layout to tell the story of who he is right now.  Some of his quirks, some of the joys, his happy little autumn self!  It was the first layout I made out of the Main Kit and came together super easy!

Don't you just love it when you can capture some little memories and combine them with several pictures!?!


Wednesday, November 4, 2015

Stitching on a Star Background

I am just loving all the new files that JustNick is cranking out.  She has so many fun files that balance trends and good graphic design!  As a mom with three boys, I definitely have a thing for stars.  So when I saw the newest Star Background 2 from JustNick I was thrilled!  I had been wanting for awhile (like since February) to write about my youngest son's new bed and bedtime routine.  A star background gave me the perfect excuse to finally record that memory!
I am big on trying to record memories of moments that I know I will otherwise forget - this is one of those! I started with cutting out the Star Background 2 and then used that as an overlay over white cardstock.  I knew I needed to use something to ground the pictures and opted for the Stitched Circle.
Instead of leaving all of the stars white - I added some of them back into the overlay.  They are still there but a little more discreet and I like the way that breaks things up a bit!
I also went through and added in some star string art....connecting the points in the stars.  Again, I just did that to some.  The rest were left white or got a little wooden star added.  This is a really fun background that you are going to love - think of all the possibilities from camping to love to sports!

Supplies Used:
Cardstock: Core'dinations
Patterned Paper: Simple Stories
Wood: Studio Calico
Stickers: Simple Stories

Tuesday, November 3, 2015

Dimensional Christmas Card

I love to use folding techniques to add something special to my cards and layouts.  Today I am going to share with you how I did some folding using the new Colorways Rouge Collection from Paper House Productions to create a Christmas card.

To make this card you will want to gather the following supplies: a 1 ½” circle punch (or use an electronic cutting machine to cut several), an A2 size card base (4 ¼” X 5 ½”) folded vertically.  One sheet of the Rouge Sculpted Entry cardstock from the Colorways Rouge Collection, the Reason for the Season 3D Stickers, and some ribbon.  Here’s a brief video on how I folded the circles on the card - you can access the video over at this blog post.

As you can see it isn’t very complicated.  I think one of the trickiest parts is picking out a good paper to do it with!  This one worked really well!  As you choose papers you have to watch out for stripes and things that may look like they need to line up.


With the second side of my paper choice being tone on tone, it made it work really well for the inside squares that show up!  


For the last part of the card I added a sentiment that is in the shape of a half circle.  I like the way it plays off the other semi circles in the card.  Just about any 3D sentiment can work really well for this project!  It also helps cover up any rough edges.  Top the whole thing off with a pretty bow and you have a striking and elegant card!

Sunday, November 1, 2015

My Creative Scrapbook November Sneak Peeks

It's SNEAK PEEK time at My Creative Scrapbook!

Oh do we have some fantastic kits for you for November!  Today I have the sneaks to share with you as well as one of my Main Kit Layouts!

Our November Main kit sneak peeks:


And here's my first layout to share with you this month!  I have a funny story to share about this one - the yellow circle was actually meant to be a regular circle.  But my circle cutter shifted on me and made it all wacko.  So I went after it with a scissors and made it a funky circle instead!
As you can see this kit is packed with beautiful fall colors and embellishments!  Just wait until you see the whole thing!
I also worked with the Creative Kit but you just get sneak peeks of that one today!

Our November Limited Edition kit sneak peeks for all you shabby/vintage fans out there:
Our November Album kit sneak peeks for all the mini album makers:
******************************
Now that you have a peek at what's coming, don't forget to reserve your kits :)
Please visit MyCreativeScrapbook.com for more information.

See you on the 5th for the full reveal!

LinkWithin

Related Posts Plugin for WordPress, Blogger...