Thursday, December 10, 2015

Christmas Layouts with My Creative Scrapbook

The Creative Kit from My Creative Scrapbook has very traditional colors for the holidays and is perfect for documenting those memories!  I have four layouts to share with you today using that kit!

For this one I tried to create a scene with the snowman and sled.  I added a Noel banner to the snowman and even busted out the Stickles to create a little snow covered ground beneath him. 

I had to cut off the snowman's arms to make the banner fit :)

 
I really enjoy doing pocket pages.  I don't want to do them all the time...but they are a fun break from the norm and allow me to get a lot of pictures squared away at once.  I am trying to do at least one pocket page each month with my kits!  This one highlights presents that the kids got on Christmas Day.  

This one has a very classic style to it - it took me forever to figure out how to place things just right!  I really wanted to include the beautiful poinsettia and that was a little tricky!  

I also added some handstitching to the ornament stickers to make them look like they were dropping down from above. I did that earlier in the year on a layout and loved the look so why not repeat it :)?  I am trying out typing my journaling more often.  Lucy and I have a very particular process for picking out her Christmas dress.  I highlighted the "requirements" in my journaling.

And now a layout that is not at all in a classic style!  This one was so fun to just play with - I did lots of clusters and of course added in the handstitching.  It came together to make a really whimsical and playful layout!

You can check out a whole gallery of work with this kit over at My Creative Scrapbook.  Tomorrow I will have a tutorial for you that uses the Main Kit!  See you then!

Tuesday, December 8, 2015

Christmas Party Favors

I'm always on the lookout for little Christmas goodies to make and give away.  SRM's clear tubes are perfect for filling with any little treat! Today I am going to show how I used them to make some peppermint filled Christmas containers.

Three of the tubes can fit starlight peppermints!  For these I used the Original Tube and the Mini Tube. You can also fit them in the Tiny Tube!  How much fun is that!?!  I filled them up and then decorated the lids with We've Got Your Border/Christmas.  And then I made a little tree using the Large Green Punched Pieces to decorate the tube.

This was really easy to create!  I simply folded in each side of the punched piece at an angle to form a tree.  I then punched out a white circle and added the gingerbread sticker from the Stickers by the Dozen/Gingerbread Man set to it. Simple, fun, and sure to make your recipient smile this Christmas Season!

Monday, December 7, 2015

My Creative Scrapbook Main Kit Layouts

Hi Crafty friends!  Today I am going to share with you the layouts I made using the Main Kit from My Creative Scrapbook this month!  The kit comes with supplies from My Mind's Eye, Photo Play Paper, and Echo Park!  It's classy and beautiful and so much fun to play with!

This one was so fun to create!  The kit includes a vellum sheet with words written in gold foil.  I fussy cut those and used them to create a tree.  I then added coordinating splatters  to fill up the white space a bit!

 There's some more of those fussy cut gold foil words but in a much more traditional manner! I really loved the gray and red plaid paper and wanted to incorporate it in a layout.  I enjoyed adding in the punches of color to liven the whole thing up - particularly adding hte embellishments to the black and white photos.  And aren't those glittered poinsettias just beautiful!?!

My last main kit layout also has a lot of detail to it but is focused more on the gray side of the kit and steps away from the gold foil.  I cut out the zig zags and then added some hand stitching to those.  Tucking my pictures behind them added a whimsical touch.  I also used lots of round embellishing to help break up the solid lines in the bottom half of the layout.

Later this week I will share some cards with you that came from this kit too!

Sunday, December 6, 2015

A Fabulous, Exciting, Wonderful, Squeal-Worthy Announcement!

Did you hear that really loud happy squeal the other morning!?!  That was me, sorry about that!  I just had a massive thrilling email in my inbox telling me that one of my biggest dreams was coming true!

 I made the 2016 Doodlebug Design Team!

  I have long been a fan of Doodlebug's products and have always had the dream of serving on their team!  I'm honored to be picked amongst all the other talented ladies and can't wait to get started! To celebrate I thought I'd share some of my favorite Doodlebug Projects that I have made over the last couple years!  This was a fun little trip down memory lane!
JustNick Cut files have combined nicely with Doodlebug products so I have done several layouts using the two for JustNick.

Crazy, crazy, crazy, time consuming string art backed with Doodlebug patterned paper and embellishments.  I made this over the summer, while in the car, and it took me hours.  I won't tell you how many ;).

This one comes from back when I was designing for Kiwi Lane Designs.

I love a good grid layout and although it's not complicated, this one that I did for My Creative Scrapbook tells the story well and makes me smile.

\
I actually did all the fussy cutting for this layout while I was on a road trip with my hubby.  13 hours in the car is the perfect time to do fussy cutting and stitching (so long as you aren't clumsy!). As you can tell this was for My Creative Scrapbook Kit Club last July.

Big fan of monkeys and big fan of fun!  Perfect for playing with Doodlebug in an effort to cheer someone up with.  This one dates all the way back to the fall of 2013.

I love adding a unique twist to patterned paper and that is played up on this Valentine card from 2014.

A recent Christmas Card with a sweet little interactive Gingerbread Man.

A recent Christmas layout with this years Sugarplum Collection.

I always enjoy playing with Doodlebug's tree stickers!  It was fun to create this little scene on this Easter layout from a couple years ago.

A recent Christmas Shaker Card

The colors in last winter's collection were so much fun - I liked the color combination and fun stickers!

I created this one in October as the guest sketch designer for Scrap Your Stash.  

Happy Harvest by Doodlebug Design - Kiwi Lane Templates
This is the oldest project in the lot - It makes me thankful for my nicer camera that makes photographing layouts an easier job :)  That said it is still a favorite design and I still have it hanging up in my scrapbooking studio and I had to include it!

 I made this one after my youngest turned two last year.  I love the little Dude Monsters :).

This one was also from last year and uses pictures of my youngest son checking out the flags at the cemetery (behind our house) on Memorial Weekend.  I loved the way the products all came together to draw the eye in on the pictures for this one.

 Knowing how much I love color, fun patterns, and whimsical designs you can see why I just love Doodlebug!  I am so looking forward to a year of playing and inspiration!  Thanks for joining me on this fun ride!

Friday, December 4, 2015

My Creative Scrapbook December Kit Sneak Peeks

It's SNEAK PEEK time at My Creative Scrapbook!

The holiday season is upon us, as are the December kits.  Just wait until you see the spectacular kits that Pam has put together!  It's not quite reveal day yet... but, we have a bunch of sneak peeks for you today!

(As always, click on the pictures to see them larger)
Our December Main kit sneak peeks: I played with this one!


******************************
Our December Creative kit sneak peeks - I also played with this one!
******************************

December Limited Edition Kits
******************************

Our December Album kit sneak peeks:


******************************

Now that you have a peek at what's coming, don't forget to reserve your kits :)
Please visit MyCreativeScrapbook.com for more information.

See you on the 5th for the full reveal!

Thursday, December 3, 2015

Faith Layout & Card

Paper House isn’t new to making Faith based papers and stickers and I have always loved using them. They are great for home decor, cards, layouts, you name it!  Today I am going to share a layout and card with you that I made with their newest Faith Collection that includes  patterned papers, cardstock stickers, and sculpted puffy stickers too! First up is a layout I created with it.

I didn’t scrapbook about a specific event for this layout but focused on what I want for my children.  I picked a couple of pictures of them as a group from a time that they had been having fun together.  I used the Faith Sculpted Stickers that said Faith, Hope, and Love to help communicate that. I also used some stickers from the Live by Faith Cardstock set. The background paper is beautiful but I wanted to add some texture to it.  I decided to add some long lines of hand stitching to accomplish that.  

This collection also makes beautiful cards!  My starting point was with the lighthouse pocket page piece. The collection includes a 12 X 12 sheet of 3 X 4 pieces that are perfect for either pocket pages or cards.  I built the card up from there including several cardstock stickers and some additional patterned paper to break things up.  I topped the whole thing off with some enamel dots and bakers twine.

Keep your eye out for this collection in your local big box stores - I’ve seen it in mine!  You will love playing with it when you get your chance!

Wednesday, December 2, 2015

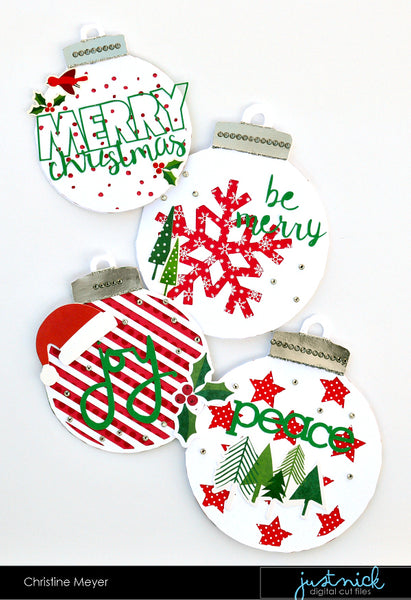
Ornament Shaped Christmas Cards - Free Cut File!

JustNick is having an amazing holiday giveaway! 
I am kicking off Day 2 of our 14 Days of Holidays cut file giveaways! Each weekday from December 1-18, 2015 we will be giving away a FREE cut file for that day only!
Today's Free Cut File is Ornaments
  I love making shaped cards and these worked perfectly for that!
I made one card with each ornament shape available!  I love that there are four fun options!  In case you are wondering how I made them into cards here's a little detail into that:
First off I rotated the ornament so that it was upside down.  I then chose to create a mirror image below it. This makes it so that I now have two of the ornaments.  I then put the hook part of the ornaments close enough together that they are slightly overlapping and weld them together.  You could also do this and mirror the ornament to the side and weld sides together instead of the hook.  Either way you end up with a really cute card! If you have questions I am happy to help explain further!
Now on to a little detail about each card and some of the additional cuts that I used! First up is the Merry Christmas Card.
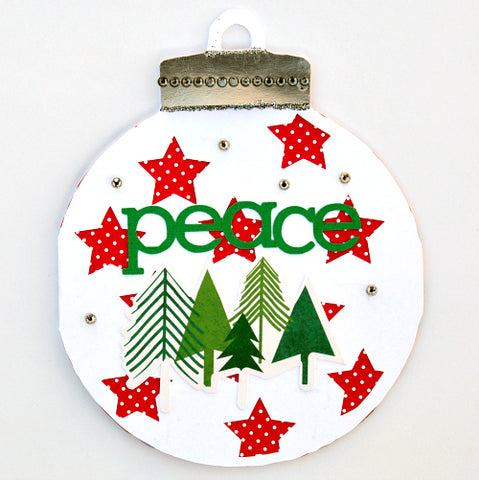
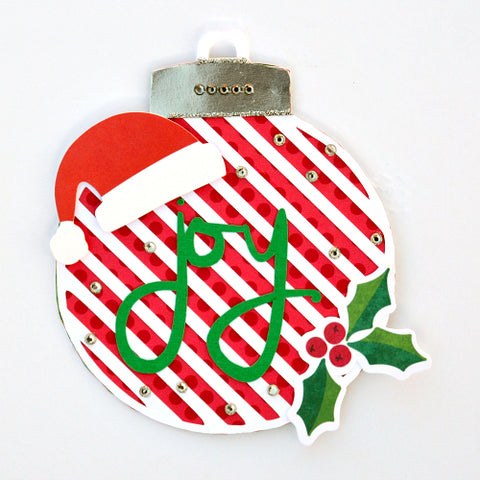
For every card I stuck with a similar base start.  I had a white ornament and backed it with red patterned papers.  I then added a silver metallic paper for the top part of the ornament and added some silver stickles and silver gemstones.  I also cut all my sentiments in green.  Doing these things helped simplify the process a bit.  I then added some stickers or die cuts to each card to fit the personality of the cut.  For this one I added the Merry Wishes file for my sentiment. I like how it is open and airy just like the original file itself.
I'm a sucker for stars and adding a peace sentiment to this from the Holiday Sentiments just seemed right for a night scene.  
A santa hat tops off the word "joy" which also comes from the Holiday Sentiments set.
Last up is a Be Merry card with a sentiment from the Merry Wishes set. We can't wait to see how you are adding JustNick cut files to your Holiday projects too!
Today’s design – Ornaments- is yours for FREE today only!
Just enter code: ORNAMENTSFREE at checkout to get this design for free.
This code is only valid until midnight CST on (December 2nd, 2015).
No purchase necessary. Happy Holidays from us to you!


Tuesday, December 1, 2015

November Planner Pages

 I've been searching for just the right planner.  I came to a realization that I needed a family one and then one just for me.  I got the Happy Planner from Me & My Big Ideas and I absolutely love it!  So today I am going to share with you my family one and how I used lots of SRM Stickers and Stamps in it!
This is my spread for the second week of November.  It was a crazy week as we were traveling for part of it! I used several different sets of stickers on here as well as stamp!  

This was a pretty awesome half of the week!  As you can see on the left side I created a list of out of the norm things I needed to do.  This was super helpful.  Now if you are wondering about my areas that are covered up with patterned paper....those I have decided will be where I have nothing planned.  Each time I have one of those I am going to add in a heart from the Life is Good Stamp Set.  I will have those there as a reminder that I have a time out from anything and I should use those times to love on my family!


Sticker Stitches are an absolute staple for this type of hobby.  I'm going to be going through a lot of sticker stitches! I was particularly into the black ones this month! I added a "Happy" sticker from the Happy Card Set.  The Calendar Companion sticker set had a couple of perfect additions as well!

With nothing planned for Saturday I took some artistic liberty and just had fun adding the November from Calendar Months/Large Snappy and the leaves!  A personal touch is added with the Have a Ball Basketball and Say It With Stickers Mini Piano. 

Of course there are more Sticker Stitches and Baby Blue Little Borders. 

My second spread is for a more normal week in our house and is packed with my writing!  For this one I used a lot of Sticker Stitches and the Silver & White Little Borders.

I used a tag stamp from the same stamp set to fill some white space. 

 I also added in some faith statements from one of my faves, the Shine Your Light set. I'll work that one in where ever I can because it is so inspiring!


I used Sticker Stitches as a border for my morning, afternoon, and evening sections and I really like the way that worked out!

It is so easy to incorporate so many of SRM's fantastic stickers and stamps to your Planner!  We love it when you share those with us and can't wait to see more!

Supplies:
Patterned Paper: Bella Blvd
Stickers & Stamps: SRM Stickers


LinkWithin

Related Posts Plugin for WordPress, Blogger...