Sunday, March 27, 2011

Grrrrowing

I love monster paper and when I saw this cute paper from Reminisce I grabbed it right up.  I thought the eyes were just perfect with this picture of Coop and his eyes!
Supplies used: K & I border, Three Bugs in a Rug Border, Cosmo Cricket letters, Reminisce pp

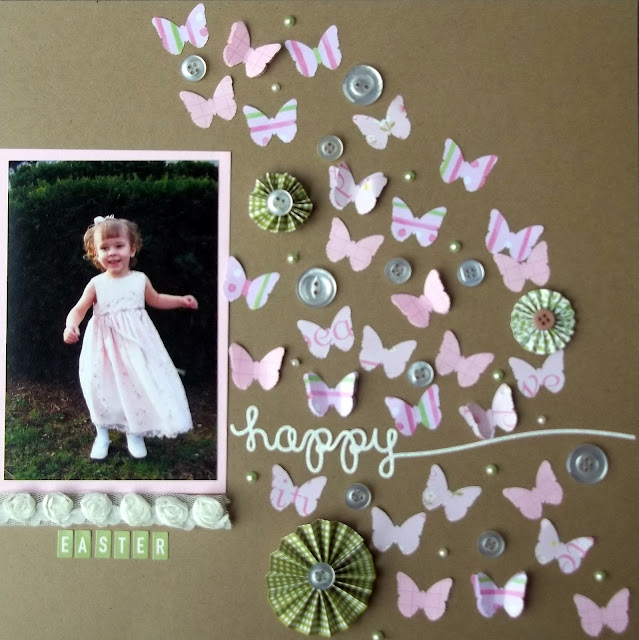
Happy Easter Layout

This layout is made entirely of leftovers!  I had lots of scraps so I just started working and punching and ended up here.  Kind of out of my ordinary approach...but fun no less.  One thing I did learn...I need to make some Glubers before I made any more medallion flowers.  Man those stinkers are hard work!
Supplies Used: Martha Stewart Butterfly punch, October Afternoon Letter Stickers

Monday, March 21, 2011

You'll Always Be...

I love the Echo Park Little Boy line, I got the whole set and it is so easy to work with and put together a fabulous page quickly!  These are some old pics that I came across of my Timmy...almost two full years ago!  
Supplies Used:  Echo Park Little Boy, October Afternoon Letter Stickers, Ruler Trim

Pixie Dust Paperie Kit

I realized I haven't shared the pics from my Pixie Dust Paperie feature for Practical Scrappers.  This kit was out of my comfort zone...but I think sometimes that is a good thing.  I pulled together several layouts I am pleased with.
The doilies in the background of the pics are actually from the packaging of some Prima flowers that were in the kit...I had to use them!

I had seen this banner from MME and had wanted it awhile, how fun to discover it was in the kit!!!  But then I had a hard time using it (:  I'm pretty satisfied with how it looks here.

Tuesday, March 15, 2011

Using some Jillibean Soup

My husband thought I should make a layout about the three foods that Lucy consumes most.  So today I present to you: Marshmallows, Meat & Macaroni...that's what Lucy is made of (:
My favorite thing on this layout is the way her name is spelled out!  I also love the little letters and big letters combo to make the title.  I did the bottom border by gluing down a heart and then folding two hearts in half and gluing each of them down on top.  It's cheap, fun to use paper you love, and adds some nice dimension.  I love the picture on this layout cuz I think Lucy looks like Shirley Temple with all those curls (:
Supplies used:  Everything on here is Jillibean soup except the red cardstock, bakers twine, and tiny red letters from Cosmo Cricket.

I punched the circles on this out of the kraft cardstock and then layered the scrap pieces of Jillibean paper undernearth.  I did some paper folding just like in the previous layout, but this time with squares.  I also did a little stitching on the scallop border to make it my own.  Check out the eyelashes on that boy!
Supplies used:  All Jillibean soup except the pins and green thread

Cupcake Wrappers

I thought it would be fun to create some cute cupcake wrappers out of some of my favorite paper from Jillibean Soup.  This was a first attempt for me and I'm very pleased with how they turned out!  For each cupcake I made a different handmade flower.  The wrappers are either trimmed with scallop scissors or fringe scissors at the top.  I made six and it was too much to take one picture of and do them justice.  So here's individual pics of each one.  I'm also linking you to tutorials for the flowers when possible!


Star Flower Cupcake

Fringe Flower Cupcake
Don't you love when you've created a project and taken a million pictures and then you let your kids eat it...only to realize that your handle was a little crooked...oh well!  I guess it's good I don't feed my children too many papercrafting projects (:

Christine original flower cupcake (:.  I taught this one at my card workshop the other night.  It's four layers of a 2" scallop.  Use a scissors to slit for each petal and connect with a brad.  Then pull the petals up and down to give them lots of dimension.  

EK Success Flower Punch Cupcake

Folded Scallop Punch Flower Cupcake

I used the Pasta Fagioli line from Jillibean along with some of their rick rack and Kraft paper.  

Thursday, March 10, 2011

Scrapbook Sussies Kit Club

I did these five layouts for the Scrapbook Sussies kit club review on Practical Scrappers.  Loved working with this kit as it included a huge amount of embellishements!  It also had lots that I modified to make my own embellishments...I love when those creative juices get flowing!

I created the border on this using the Scallop Punch and then filling in the holes with patterned paper from the kit.  It was faster than it sounds (:


I made the flowers on this one and also fussy cut the little circles on the right.


The kit lended itself to Lucy layouts...but I still managed to get those boys in a little bit (:

Saturday, March 5, 2011

Gram meeting Cooper

Apparently I am on a Gram roll this week...a layout about both Grandmas!  I love this Bella Blvd paper but struggled with figuring out to use it in the best way!
Supplies used: Bella Blvd paper, Kraft cardstock, Echo Park Journaling die cut, bakers twine, Jillibean soup corrugated letters, Cosmo Cricket letter stickers.

Thursday, March 3, 2011

Layers of fun

 Saw this paper stack from GCD at Michaels and loved the colors and sheen of it...so I snagged it.  It worked really nicely with these pictures of Grandma & the kiddos.  I fussy cut some of the flowers out of the patterned paper you see on the left.  I punched some white paper with my scallop punch and attached them to that.  For the next layer I wrapped thread in a circle...slowly and carefully.  It was easier than you might think (:.  Topped it off with a button and voila, got my own one of a kind embellishment!

 I really love the one with the bow tied in the button.

Beautiful

I started the base of this layout over a year ago...and somehow it got buried and I got distracted with baby Cooper.  When I found it in a pile yesterday I pulled it back out to finish.  The brown flowers are stamped as is the blue background.  This layout in person has sooooo much texture: flocked paper, stickles, bling, a huge flower....lots of fun to it!
Supplies used:  CTMH Dimensional Elements, GCD Journaling die cut, GCD Flocked Paper, ATD sticker title, Cosmo Cricket letter stickers

Wednesday, March 2, 2011

My Scrapping Room

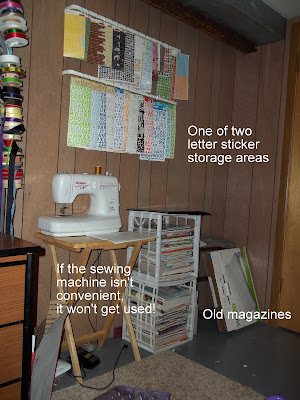
I, like most people, scrapbook on a limited budget and very limited time allotment.  So when I organize I need it to make things easy.  After creating a few organizational tools and finding some deals at garage sales I'm nearly satisified with how my room is set up!  Here's some of my ideas, I've written info onto the pictures. Everything that you see for storage has been bought for $1O or less!  I always go into a yard sale looking for something new to add to my organization stash.  I figure if that stuff costs less, there's more to spend on the actual creating!


To make my letter sticker storage:
I used curtain rods that cost $1, drapery hooks that were 8 for $1, and paper clips.  I slid the paper clips onto the drapery hooks and hung the stickers on there.  It works great except for really heavy letter stickers.  I organized each section into a manner that worked for me.  If you'd like more detailed pics of how I put it together, leave me a comment and I'll be happy to email you!


LinkWithin

Related Posts Plugin for WordPress, Blogger...